
SketchUp Makes Bathrooms Nicer
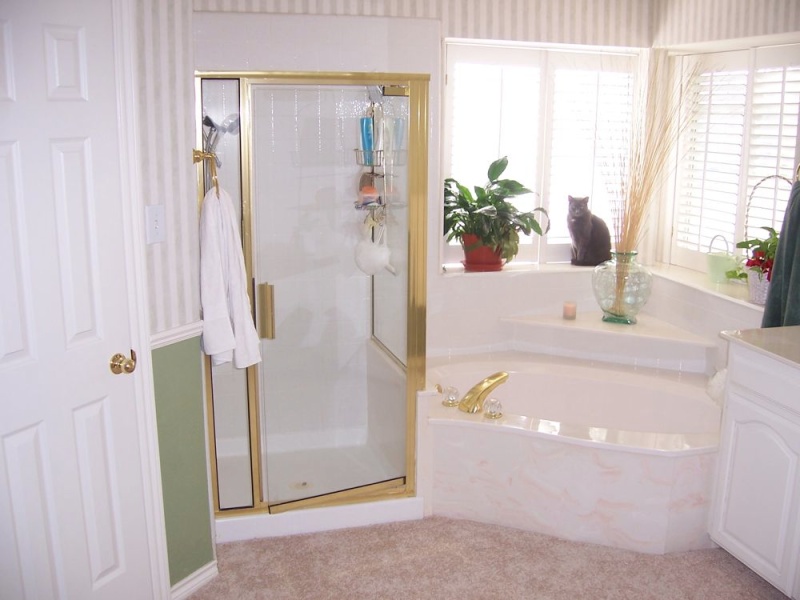
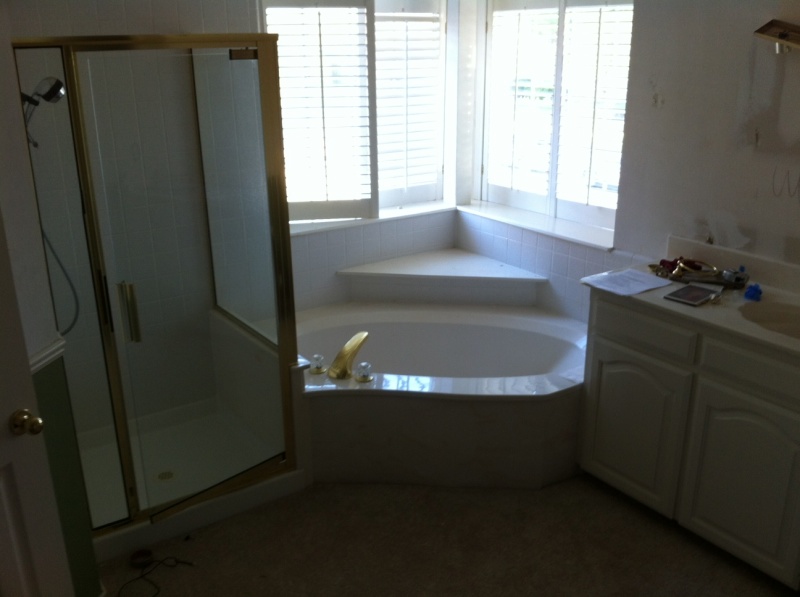
We’ve gone through our first round of remodel-hell trying to get our master bath in shape. The upstairs master bath had carpet which was basically a deal-breaker for Bety, and coming from our much smaller apartment we didn’t really feel the need to use the full master.
We knew we wanted to tile the bath but also knew that once we tiled we would be locked in to the major layout so any changes to make had to be made in conjunction with laying tile.
 Previous Owner |
 Stripped Wallpaper |
We kicked around a few ideas but the one that stuck was swapping the existing guy’s vanity and the shower. Both were reasonably well “plumbed” for supply, venting, and drainage, and since the “guy sink” was “extra” and obnoxiously large anyway it made a lot of sense to use that area and build out a larger shower in that vanity location.
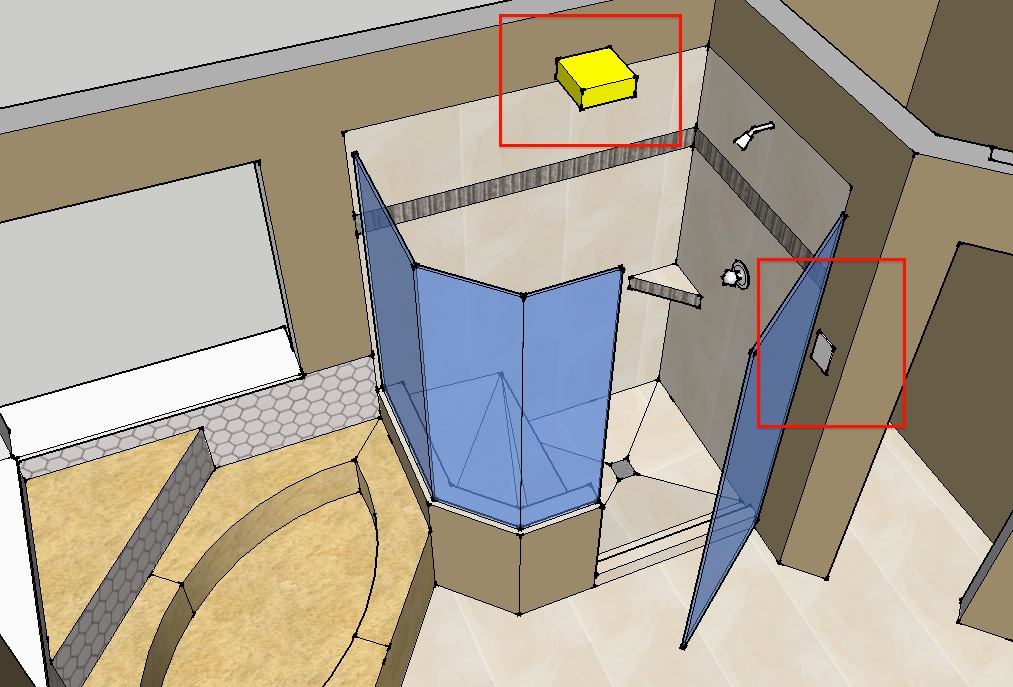
I got started measuring and modeling the bathroom, as that was something “free” I could do, and it turned out that doing the model was extremely helpful in order to make things “look right” or get a sense of scale. Much easier to demolish a wall in SketchUp than in real life, and a heck of a lot quicker to paint the walls a different color too!
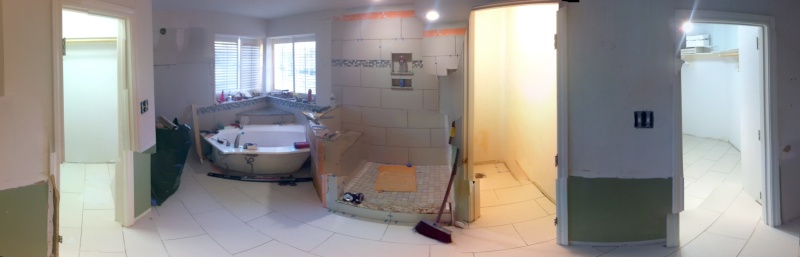
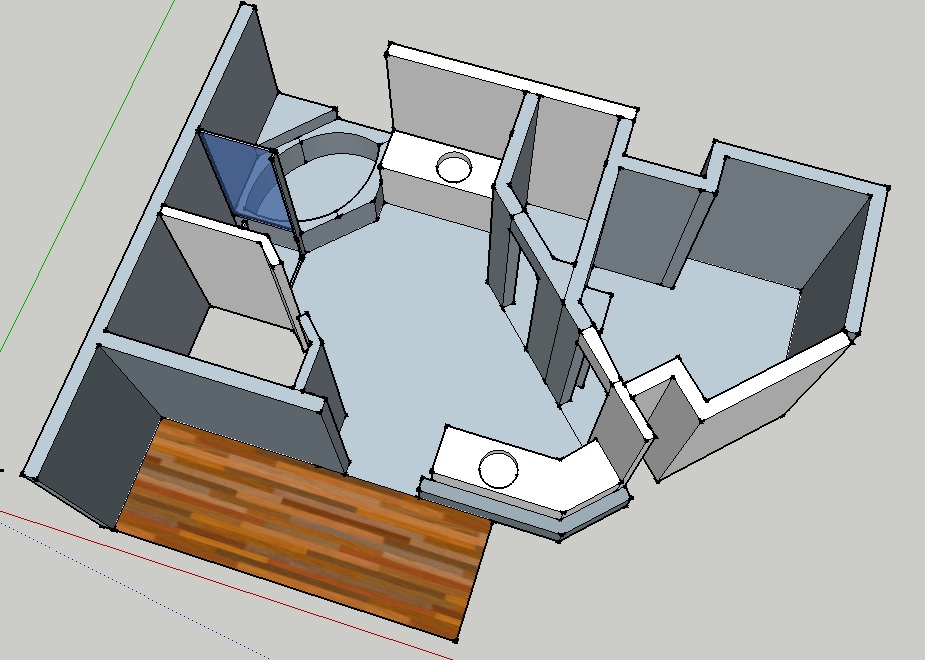 Rough “Pre” Overview |
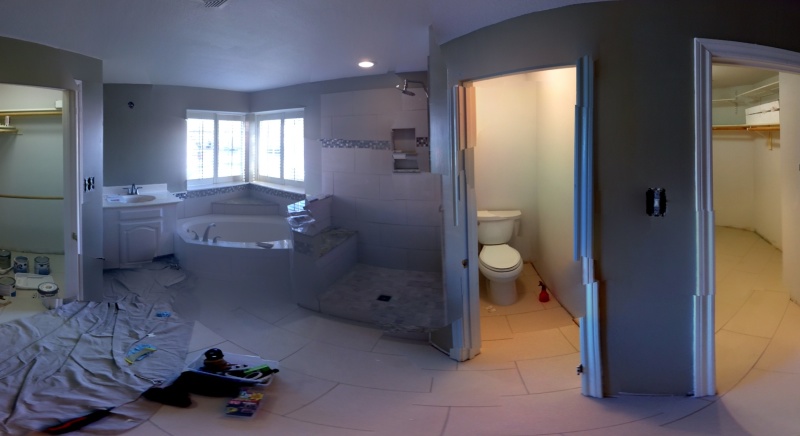
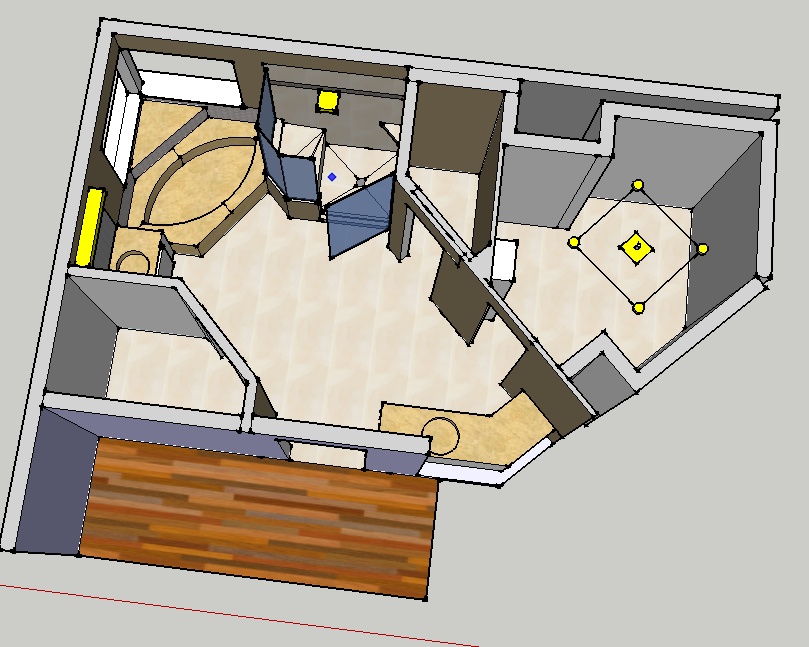 Better “Post” Overview |
The model on the left is the basic “pre” model and the model on the right is “improved” and slightly more true-to-life. It let us play with heights for the shower wall, get an idea of whether the new vanity location was “big enough”, see where / how the lights might look, how the tile colors and wall colors would interact, etc.
Highly recommended if you have the chops to get a model going in SketchUp again because it makes simulating things so much easier. Other things we considered were enlarging the “throne room”, messing with closet walls, making one of the vanities a “sit-down” style, and it was easy to poke a hole into SketchUp and check sight lines or materials / paint colors to see how it would look.
Using SketchUp also allowed us to realize that we’d need to add / move some electrical around, especially the light-switch which would originally have been near the shower door. Putting in the virtual shower-door forced us to come to terms with the fact that the original switch and switchplate would have been uncomfortably close to the shower opening and that moving it over to gang up with the closet light (and adding an over-shower light) was a good choice.
Electrical Annotations
Having the 3D model made it a lot easier to explain things to the contractors that we ended up working with. Which is a whole ‘nother story but one that I might as well tell now.
We’d previously worked with a plumbing company to fix our main sewer line which had a root incursion. We liked the work and attitude of the plumber who was assigned to our job kept a hold of his information for future plumbing needs.
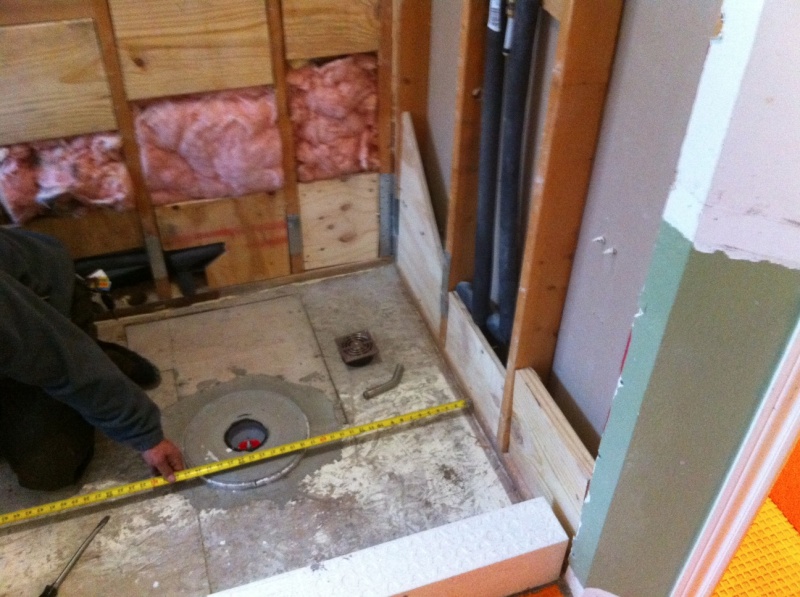
Long story short this plumber was not the right person for our bathroom job. It’d take another wordy document to describe all the mistakes made by the plumber (and delays caused) but the one that stands out is that he originally didn’t think it necessary to affix the shower drain to the subfloor (duh?) and instead left it kindof floating with the pan-liner plastic kindof wadded up in a ball all over the place. This caused me to start looking into plumbing codes (Section 405.4 and 417.5.2 specifically) and tile forums realizing that there wasn’t a single thing right with the way things were going. Ugh.
But I have to look at it as a blessing in disguise because between Larry, Moe, and Curly that were the plumber, “general” contractor, and his assistant we’d picked to do the work, it forced me to really learn how a proper shower is put together, and how improper everything was going compared to how it should have been done.
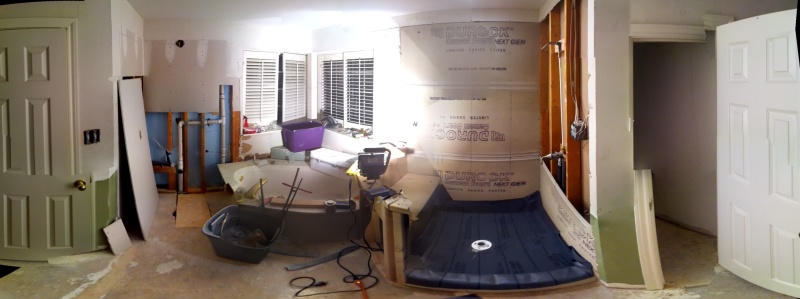
Had to rip this work out
The contractor came highly recommended as having done work for area restaurants. According to him he had just landed a job doing the wet area for an entire gym being built in Lewisville.
As you might be able to tell, I had a pretty clear idea of what we wanted, the work required and I broke down a punch list of all the major areas and subtasks to make it all happen.
He wrote a quote that was a bit higher than we were expecting but we went back and forth trying to figure out ways to bring down the cost (we’d do paint + trim + demo + garbage disposal saving ~10-20%) and kindof came to an agreement on how to get started. With luck we wanted to be close to finishing from the first weeks of October to just before Thanksgiving when a friend of Bety was coming to visit.
The first warning sign came when he was willing to lay tile directly onto the plywood subfloor. Picking out all the finishings / material was a whole different mess that took a lot of time, and I’d have been damned if he was going to lay this not cheap (but not expensive) tile we’d picked straight onto a plywood subfloor.
The two three lines that immediately came to mind were “That’s now how they do it on TV”, “Show me on the Manufacturers Installation Instructions where it says that you can lay tile directly on plywood”, and “Oops, I guess I didn’t specify that I wanted the work done correctly.”
His response was “If you get tile installation from Home Depot they’d lay it just like this.” Which may or may not have been the case, but I wasn’t in the business of finding out. “It’ll cost more” he said. “That’s fine, just so long as it’s done right” was my reply.
Then we had finally gotten to the point where the plumber had the rough-in inspection passed, the waterproof shower pan liner attached to all flat surfaces, and I had a chance to re-hang the shower wall cement backer board (myself!?!) and had waterproofed it, we called the contractor back.
“Great,” said the contractor. “Let me just poke screw-holes through your waterproof membrane and into this untreated plywood.” Which if you’re not technically inclined is a bit like saying “Let me drive your Ferrari into that brick wall over there.”
Poke holes into my waterproof membrane that I’d spent so much effort with the plumber getting installed right and plumbing passed? No thanks.
At this point the relationship between me and the contractor was in a word “strained” and I needed a third party expert to give me a somewhat neutral, fact-based opinion.
New Contractor - Redoing Work
My stroke of genius was to call the shower-glass company and ask them if they had any contractors they recommended. There may be 1000+ contractors in Dallas, but proportionally much fewer companies that install the end-product shower glass enclosures. I wanted a connection with somebody the glass company saw a lot of, not with HandyMan2.0 who may or may not know anything about bathroom remodels.
Chris from Pineapple Home Creations was able to swing by and confirm my suspicions and more. That the work done up to that point was likely not going to last more than a year or two without significant problems. “Great… give me a quote.”
The most frustrating thing about this whole experience was that the quote and labor charged by Chris was pretty much exactly the same as the price charged by the original contractor, except where things cost more in order to do it the right way. ie: the flooring installation cost an extra $500 in order to install our tiles over a better (ditra-mat decoupling membrane) subfloor. All labor rates were the same except where he could point to something and say: “That… that costs you more but it’s done right and will last.”
So it was an expensive lesson to have started with a crappy plumber and somewhat crappy contractor, but “worth it” to be able to sleep well at night and not have that fear of liability where you’re worried that your shower might leak, or mold might be growing and rotting your wood. It’s scary to have work done on your place and comforting to have confidence in the work that’s been done.
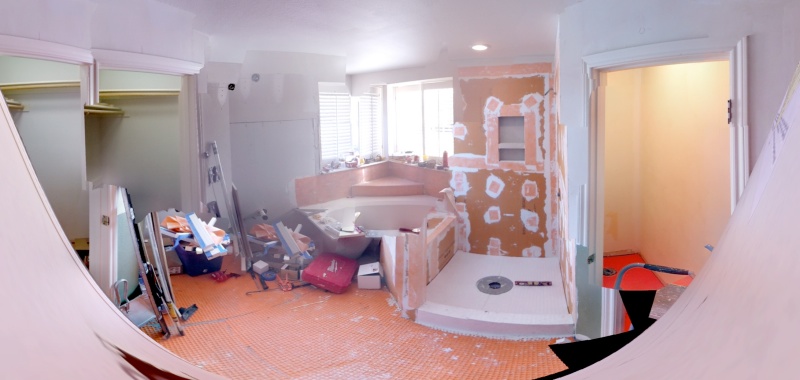
Surface Prep
Majority Tile Work
Painted And Grouted
The work progressed pretty quickly after the initial false start and we are now just waiting on final glass installation and for me to do miscellaneous trim work (baseboards, towel-holders, etc).
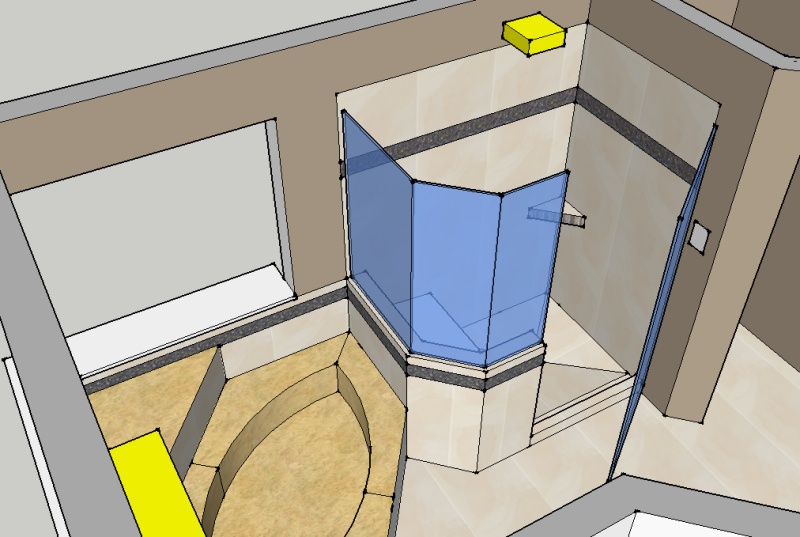 Shower Model |
 Shower Actual |
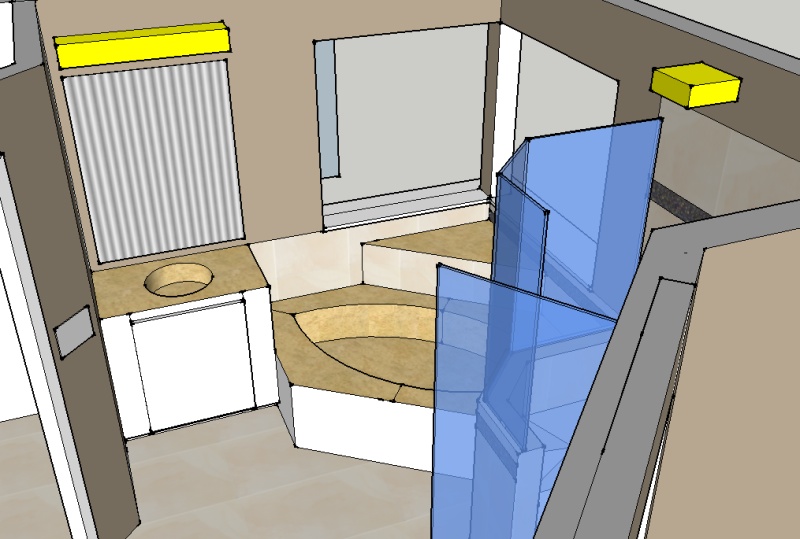 Vanity Model |
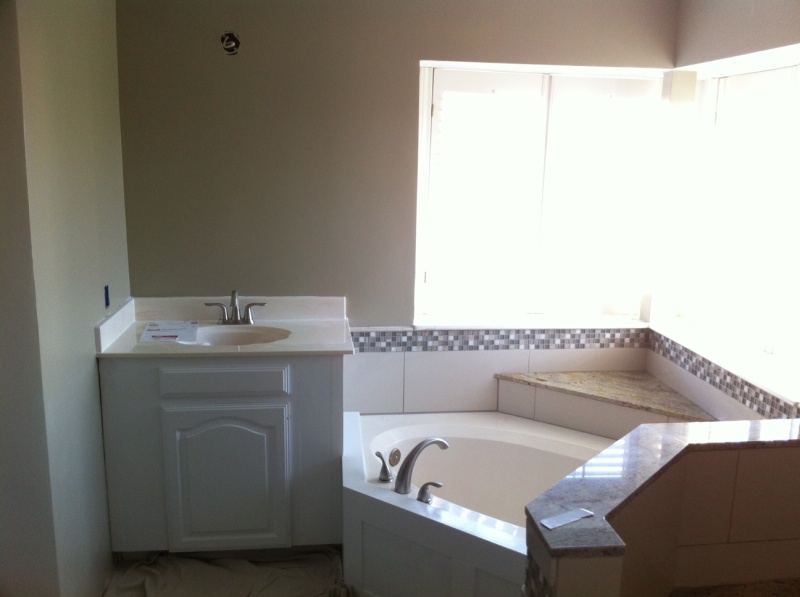 Vanity Actual |
In some ways it’s pretty amazing to see the model compared to actual results. The pictures aren’t the greatest, as you can see there is still work to be done (mirrors, trim, cleanup). With luck I’ll be able to update this info to show the true final product and see how it compares.
11:46 CST | category / entries
permanent link | comments?