
Carrollton treasure new little fruteria at Josey / Frankford by Nico’s http://www.robertames.com/files/2010-05-27/pina-colada.jpg
08:30 CST | category / entries / tweets
permanent link | comments?
08:30 CST | category / entries / tweets
permanent link | comments?
Mix sugar, buttermilk, salt, butter and pecans in a large glass bowl with handles (the mixture gets very hot and rises).
Microwave for 12 minutes, stopping to stir every 4 minutes.
Stir in baking soda, the boiling hot mixture will rise and foam, possibly doubling or tripling in volume.
Microwave 1 minute, stir until sticky.
Drop onto foil (not wax paper).
21:43 CST | category / entries / recipes
permanent link | comments?
Use bowl with handles. Stir peanuts, sugar, syrup, salt. Microwave 4 minutes, stir well. Microwave 4 minutes, stir, add butter and vanilla. Microwave 1-2 minutes, stir, add baking soda (it will expand, might overflow, be careful).
Turn onto lightly greased cookie sheet. Smooth out peanuts. Let cool, break into pieces.
08:34 CST | category / entries / recipes
permanent link | comments?
A former co-worker pinged me with a question:
Some people want to upgrade for the sake of upgrading, and I am the opposite, like if it aint broke don’t fix it mentality. Do you have any useful articles on the subject?
I wasn’t able to come up with anything that matched exactly what my thoughts were so that means I get to write them down.
The benefits of upgrading are generally:
The disadvantages of upgrading are:
You still eventulaly have to upgrade but frequent upgrades can leave you with more doubts and questions than the benefits they provide.
The sentiment I was looking for and couldn’t find was that if you have Automated Acceptance Tests for new releases of Third Party Libraries then you can upgrade as often as you’d like.
Consider a situation that I lived through at a previous job. The company I worked for was integrating with a commercial third-party library and every code drop alternately caused or fixed an arbitrary number of bugs. It was really slowing the project down (because the third-party library was not yet finished but provided key functionality to our company’s project), integrating with these code drops chewed up a lot of testing and developer time and caused a lot of uncertainty when there were any problems.
One of the developers then wrote some automated acceptance tests around the third-party API. Calling these three functions in this order and it should have a certain behaviour. Calling a different function should have this other affect. When code drops came in that did not meet the automated acceptance tests, he was able to reject the library releases within minutes instead of taking on that new, unknown instability for no benefit.
In a well-functioning system, these are basically the same thing as automated unit tests but in a lot of cases when you receive a library you don’t receive the unit tests. In addition if unit tests are added, removed, or changed, it might be difficult to know if the library in question has changes that are worth knowing about or whether the changes are irrelevant to how you are using the library.
In the absence of your own Automated Acceptance Tests from a consumer / customer perspective, a thorough system-level or integration test can suffice because it will generally point you to the problem areas. In certain cases though, the return on investment of writing your own customer-managed Automated Acceptance tests are a huge plus… especially with relatively unstable or immature libraries. In the open-source world, they are especially valuable to contribute back upstream, as then your specific use cases will be much less likely to break (vis the old SpikeSource, which used to make money selling extra-tested packages of open source software).
And if you’re not even in the door with automated testing (either your own unit or “sloppy integration”) you’ll get the best ROI investing in post-deployment tests, a good staging environment, and the ability to test out whether a certain underlying software upgrade is going to break your system or make it “better”.
17:55 CST | category / entries
permanent link | comments?
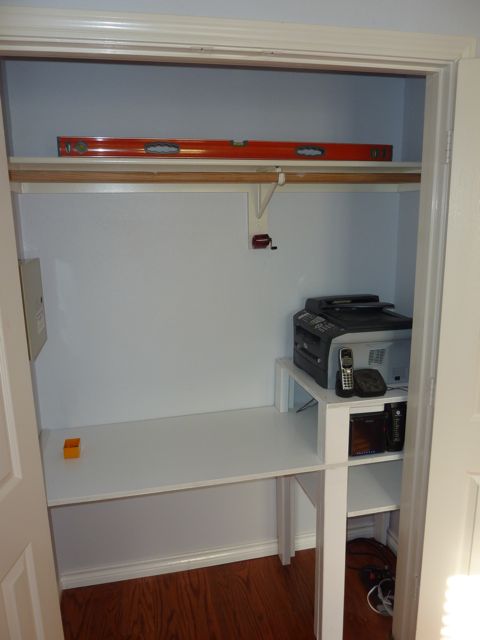
I started planning some shelves for my office closet a little less than a month ago. It’s a fairly large closet and none of the electronics are real heat-hogs so I’m not too worried about ventilation. I mostly wanted a place to hide the printer (and router, and external hard drives) along with a work-surface to either throw down a laptop or work with printouts / copies when I need to be doing that type of stuff.

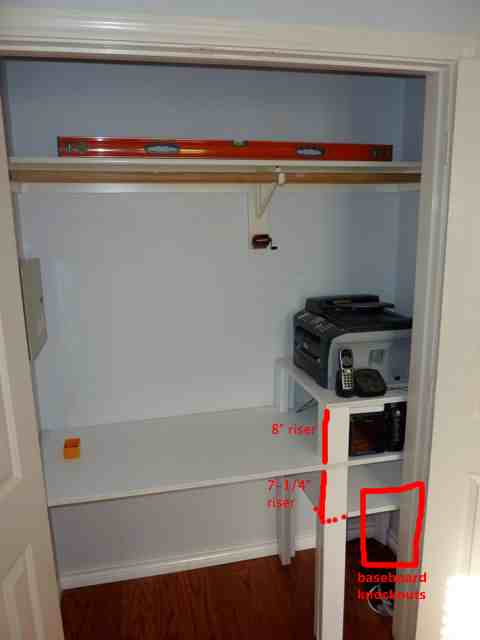
Major differences between the inital design and my final were changing the left-most mounts to be a cleat instead of legs and changing from universal 3” posts to “ell” constructed 2x4’s + 2x2’s. It turns out that 3” posts are only carried in my imagination and that posts sold at Home Depot are 4”, which felt entirely too bulky for what I was doing.
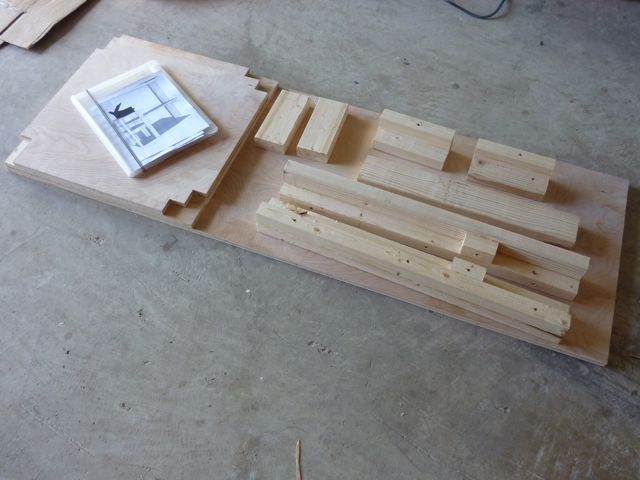
Before going to Home Depot for the wood, I planned and wrote out my parts list based on the sketchup design and a final set of “accurate” measurements. This was really helpful when I needed to figure out how many linear feet of 2x4’s I was going to need and what size board I needed to buy.
I ended up splurging a bit on the top plywood and got one with the smooth birch veneer because I knew I might be using it as a light-duty desk surface. It was only a few dollars more but has a nice smooth feel to it although you have to be careful about shredding the veneer when cutting.
I did all cuts with a basic circular saw and a hand-saw for detail/final removal (ie: when cutting out the “ell” sections from the bottom shelf). I can’t overemphasize the helpfulness of clamps and long, straight levels.
I don’t have a table-saw, so to make the longest cut I snapped a chalk line (straight), used two levels and some scrap wood along with some bracing to keep all my straight edges “in line” while running the circular saw down the board. Originally I had planned on using the 2x4’s but they were nowhere near straight over a 5-6’ run.
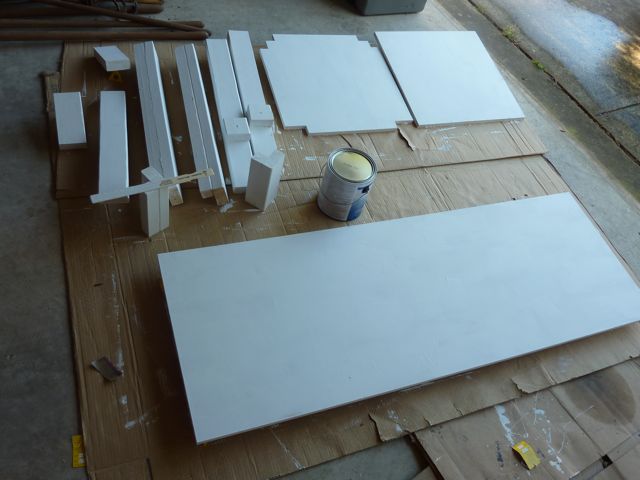
After all the piece-assembly I was left with your basic ikea-style furniture pack. I ended up priming everything twice, then another two coats of white latex glossy (standard “trim” paint) and it came out acceptable. It would have been nicer to keep the dust down as I ended up with some random crap on the large surfaces after the first glossy coat. I sanded some of that down then did the final coat with the garage door closed which helped quite a bit.
During the dry-fitting I discovered two problems and realized one problem during piece-construction:
Installation was pretty straightforward and the shelves as a whole feel nice and solid. I purchased some trim pieces for the front “desk” shelf and for the left-hand side to cover the cleat-screws. Those are yet-to-be installed, mostly waiting until I can prime / paint the trim. It’ll take 5 minutes to paint everything but 30 minutes to clean the brushes, etc. When I have the paint out I also need to paint over some of the exposed screw-holes on the shelf-top.
If you’d like to play with the SketchUp file, have at it. The best advice I have is to do the “three chairs” tutorial, use the tape-measure tool a lot, and paradoxically, sometimes it’s a lot easier to draw things out right the first time than it is to fix or modify an existing drawing.
11:53 CST | category / entries
permanent link | comments?
15:34 CST | category / entries / tweets
permanent link | comments?
Like what you just read? Subscribe to a syndicated feed of my weblog, brought to you by the wonders of RSS.
Thanks for Visiting!