Nuts and Bolts
- 1/2 box pretzel sticks
- 1/2 box rice chex
- 1/4 box cheerios
- 1 can mixed nuts
- 1 package walnut or pecan halves
- 2 sticks margarine, melted
- garlic powder
- 8 dashes worchestershire sauce
Preheat oven to 250.
Mix all ingredients in a wide pan (not deep).
Place in oven for 1 hour, stirring every 20 minutes.
Store in airtight container with paper towels around bottom / edges.
13:49 CST | category / entries / recipes
permanent link | comments?
Energy Statistics for 2013
I’ve been getting what feels like “low” electric bills and I wanted to understand them a bit better so it means fun stats time!
Baseline gas load ~$25/mo
Baseline electric ~$45/mo
Minimum utility load ~$70/mo
Maximum utility load ~$195/mo (~3x base load?)
Average utility cost ~$130/mo (~2x base load?)
If you assume that the month with the minimum cost’s average temperature was 73 degrees (May @ $90), it looks like every degree below that costs $2/degree, but every degree above that costs $7/degree. Don’t know what conclusions to draw.
Dec 12 - Temp: 51 - Gas: $55.33 - Elec:  $68.82 - Total: $124.15
Jan 13 - Temp: 49 - Gas: $93.52 - Elec:  $69.52 - Total: $163.04
Feb 13 - Temp: 52 - Gas: $84.14 - Elec:  $56.17 - Total: $140.31
Mar 13 - Temp: 56 - Gas: $66.93 - Elec:  $48.75 - Total: $115.68
Mar 13 - Temp: 56 - Gas: $44.63 - Elec:  $62.55 - Total: $107.18
May 13 - Temp: 73 - Gas: $47.55 - Elec:  $42.85 - Total:  $90.40
Jun 13 - Temp: 83 - Gas: $31.95 - Elec: $102.24 - Total: $134.19
Jul 13 - Temp: 85 - Gas: $28.76 - Elec: $163.43 - Total: $192.19
Aug 13 - Temp: 87 - Gas: $27.54 - Elec: $153.40 - Total: $180.94
Sep 13 - Temp: 83 - Gas: $27.15 - Elec: $155.47 - Total: $182.62
Oct 13 - Temp: 69 - Gas: $27.98 - Elec: $112.53 - Total: $140.51
Nov 13 - Temp: 54 - Gas: $37.04 - Elec:  $57.88 - Total:  $94.92
19:44 CST | category / entries
permanent link | comments?
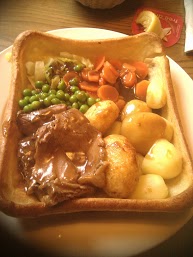
Yorkshire Pudding
- 1 cup flour
- 2 eggs
- 1 cup milk
- 1 tsp salt
- 3 tbsp grease / crisco / pan drippings
Preheat oven to 425 degrees.
Sift flour and salt.
Break eggs into flour mixture, beat until smooth.
Add milk slowly, beating until smooth.
Cover 9x12” glass baking dish with ~3 tbsp grease or drippings.
Place just greased pan in oven until the grease melts and is sizzling hot.
Remove pan, pour in batter, return to oven.
Cook at 425 for 20 minutes, then pour off fat.
For an advanced version, try this:
(courtesy Mr. Alan Cox)
15:28 CST | category / entries / recipes
permanent link | comments?
Bruschetta
- 1 cup tomotoes, diced
- 1 clove garlic, minced
- 2-3 leaves fresh herbs, chopped
- (preferably fresh basil, but you can use dried “italian mix” seasoning)
- Splash of Vinegar (~1 tsp?)
- Splash of Olive Oil (~1 tbsp?)
- Salt and pepper to taste
- Thin toasted bread
Dice tomatoes and place in a bowl.
Mince garlic, chop basil.
Drain any excess liquid / water from the tomatoes the add the garlic / basil.
Add salt, pepper, oil, vinegar, mix by had and let the mixture rest in the fridge.
Toast bread then serve mixture spooned on top.
Usually I’ll use fresh basil with a little dried oregano added for some extra flavor.
Be very careful to use only a little bit of vinegar if you are not used to cooking with it.
If you add too much salt, the mix will be overly salty and unpleasant.
Let the mixture rest before tasting (so flavors combine), and try a little bit immediately before serving.
If more salt is needed, you can easily sprinkle some over the prepared toast or add a little more to the mix.
11:10 CST | category / entries / recipes
permanent link | comments?
Spaghetti Carbonara (simple)
- 1 lb spaghetti
- 6 slices bacon, diced (~1 lb?)
- 1 cup milk
- 2 large eggs
- 2 egg yolks
- 1/2 tsp salt
- 1 tbsp flour
- 3/4 cup grated parmesan cheese
- 1 1/2 tsp cracked black pepper
Boil Spaghetti according to directions (salted water), reserve 1 cup pasta water.
Saute bacon until crispy, reserve 2 tbsp bacon drippings.
Blend milk, eggs, yolks, and salt.
Heat bacon drippings and whisk in flour. Cook 1 minute.
Rapidly whisk in egg mixture. Continuously whisk so the mixture doesn’t scramble!
Cook mixture 2-3 minutes so it thickens.
Remove from heat and mix in ~1/2 cup of the parmesan cheese.
Toss with pasta, bacon, reserved cheese, reserved water, and pepper.
14:06 CST | category / entries / recipes
permanent link | comments?
TrebuKit
Very simple “kit” for building the small trebuchet shown in the video below.
instruction pdf, sketchup file
Please send me a note if you end up building one!
13:30 CST | category / entries
permanent link | comments?
iPhone 6 Predictions
I ordered the new iPhone 5S, upgrading from an iPhone 4 so it’ll be a relatively large leap in technology.
Apple usually adds one major feature per upgrade (Retina, Siri, TouchID), and is currently catching a lot of flack for not having NFC.
My prediction for the next iPhone is that it will have NFC, and it will be linked with the TouchID sensor. Likely it will be called “TouchPay” and Apple will pursue relationships directly with retailers, or piggyback on the existing Visa/MC NFC efforts (PayWave? PayPass?).
What brought it to mind was the comedian on “Wait Wait Don’t Tell Me” who said “Apple just sits around inventing stuff up for people to be frustrated with. God! I can’t believe how long it takes to type in four numbers for my PIN.”
While mentally salivating for the new phone, I started imagining how you would have to use the TouchID sensor to unlock the phone. Would you be able to use just one finger / fingerprint, or would you be able to use both index and thumb? How would you hold the device.
I was travelling at the time and during the ceremonial “human pit stop” of taking everything off and putting it into the bins, I had taken my belt, keys, and wallet and put them into my backpack ahead of time. I kept my phone in my pocket and put that into the bin separately with my shoes.
That’s when it hit me. The next iPhone will try to be a replacement for your wallet. I already have two friends who use one of the cases that let you slide in credit cards / cash (basically a mini-wallet).
Assuming the next device has NFC, you’ll grab the phone, holding the home button with your thumb, and tap it onto existing NFC payment terminals.
Apple is basically releasing TouchID in this generation of phones to acclimate people using it as a “fig-leaf” of security. PIN codes aren’t to keep serious hackers out, but instead to keep some modicum of privacy against strangers. Same with the fingerprint sensor. If you’re hacker enough to defeat a fingerprint sensor, you’ll be hacker enough to figure out somebody’s unlock PIN.
By making the fingerprint sensor “unlock” the NFC capabilities, and with a year’s worth of acclimation and bugfixes to Apple’s touch technology, you’ll finally have an NFC payment system people will trust. Bring something, know something, be something is the “iron triangle” of security / identification, and linking NFC + a smart device + biometrics adds that second factor authentication to NFC payments.
In review:
- iPhone 6 will target being a “wallet-replacement”
- Passbook handles most of your “loyalty”, ID and insurance cards
- Passbook also handles “tickets” (Lufthansa’s implementation is really good!)
- iPhone 5S introduces fingerprint-to-unlock
- NFC is finally popularized (Apple is letting Samsung lay the foundation)
- iPhone 6 will have NFC support
- NFC support for payments will be a natural extension of fingerprint-to-unlock
- TouchPay.com is owned by an individual, currently “under construction”
- Apple is currently pursuing at least one state to allow some form of “Digital Drivers License” (ie: Passbook support)
- …or you’ll just leave your license in your glove box day-to-day.
These thoughts aren’t all that new, an article from a year and a half ago makes many of the same arguments. But I’m putting my predictions out on the line, launch weekend, and am willing to take bets against it.
09:16 CST | category / entries
permanent link | comments?
Cowboy Cookies
- 1 cup shortening
- 1 cup brown sugar
- 1 cup white sugar
- 2 whole eggs
- 1 tsp vanilla extract
- 2 cups flour
- 1 tsp baking soda
- 1/2 tsp salt
- 1/2 tsp baking powder
- 1 pkg semisweet chocolate
- 2 cups rolled oats
Cream shortening and sugars.
Mix eggs into shortening one at a time, trying to get the mixture fluffy.
Mix vanilla into shortening and egg.
Sift together flour, baking soda, salt, and baking soda.
Mix (slowly) flour into shortening mixture.
Mix (slowly) oats and chocolate chips into mixture.
Drop approximately 1 tbsp onto greased cookie sheet (do not form into balls).
Bake ~15 minutes at 350 degrees.
11:40 CST | category / entries / recipes
permanent link | comments?
Baked Beans
A combination of two recipes, from-scratch baked beans turned out pretty well for the BBQ. The sauce I’ll give is more of a ratio for the sauce as compared to an exact ratio of sauce-to-beans. You’ll end up with relatively lightly sauced beans, not beans drowning in a too-flavorful sauce. Don’t skimp on cooking time, you’ll need closer to 4 hours total than 2 hours. Once they’re baking in the oven you’re in good shape as they can “hold” very well, an extra 30-60 minutes will not do them any harm if they’re already cooked. Next thing to try is lightly salting the water when soaking the beans.
- ~1lb dried navy beans, soaked overnight
- ~1lb bacon, cooked, crumbled, reserve drippings
- ~1 cup ketchup
- ~1/2 cup mustard
- ~1/4 cup brown sugar
- ~1-2 tbsp molasses
- ~1 tbsp worcestershire sauce
- salt, pepper
- 1-2 cups onions, finely diced
- 2-4 tbsp reserved bacon drippings
Wash and clean beans.
Soak beans generously covered in water overnight.
Boil beans in soaking water for ~1-2 hours (beans should be slightly mushy).
Add more boiling water if necessary to keep beans covered.
you should be able to smash a bean between your fingers with some resistance
Drain beans, reserve liquid.
While beans are boiling, crisp and crumble bacon, reserving fat.
While beans are boiling, add wet ingredients to a sauce-pan.
Mix over medium heat until well-combined (2-5 minutes).
Combine beans, diced onions, sauce, some reserved water, and some reserved bacon drippings in a casserole dish.
be sure to taste beans at this point and adjust salt, pepper, drippings ratio until you are happy with the flavor
beans should not be swimming in liquid, but there should be enough sauce to coat the beans when mixed
the reserved liquid is to prevent beans from drying out when they bake
Cover casserole with aluminum foil.
Bake for 1-2 hours at 325 degrees until beans are soft.
09:07 CST | category / entries / recipes
permanent link | comments?
Cheesecake
- 1 3/4 cup graham cracker crumbs
- 1/2 cup butter, melted
- 1/3 cup sugar
- 4 x 8oz package cream cheese
- 1 cup sugar
- 1 tsp vanilla
- 4 eggs
Combine crumbs, butter, sugar and gently press onto sides and bottom of springform cake pan.
Blend cream cheese, sugar, vanilla in large bowl with blender until combined.
Blend in one egg at a time until smooth, do not over-work.
Pour batter into crust.
Bake 45-50 minutes until center is almost set.
Let cool for 5 minutes, then slide thin spatula between crust and rim of pan.
Let cool and refrigerate overnight (4+ hours).
Top with strawberries + glaze if desired.
08:36 CST | category / entries / recipes
permanent link | comments?
Tomato-Peach Barbecued Ribs
- 4-5lbs pork ribs
- 1 onion, chopped in quarters
- 2-3 whole cloves
- 1-2 bay leaf
- 2 cups chopped, peeled peaches
- 1 can condensed tomato soup
- 1/2 cup light corn syrup
- 1/2 cup cider vinegar
- 1/2 cup packed brown sugar
- 1/4 cup cooking oil
- 1 tbsp worcestershire sauce
- 1 tbsp dry mustard
- 1 1/2 tsp paprika
- 1/2 tsp salt
- 1/2 tsp garlic powder
- 1/2 tsp pepper
Bring to boil ribs, onion, cloves in large pot with ~2 inches of water covering ribs.
Cover and simmer for ~1 hour.
Combine other ingredients over stove in sauce pan.
Simmer sauce for ~20 minutes until slightly thickened.
I have never made the sauce the same way twice. Try it with chipotle.
Remove cooked ribs from pot, baste with sauce on low-medium grill until ribs are sticky.
You can even finish ribs on a baking tray in the oven on high heat.
08:31 CST | category / entries / recipes
permanent link | comments?
Slow Cooker Carnitas
Using the following (visual) recipe as a base, I tried making these carnitas, but in a slow cooker instead of stovetop. You can follow the original recipe but I’ll share as I made it.
- 4-6lb pork butt roast
- 1 large onion, cut in eighths
- 4 cloves garlic, diced
- 1 tbsp cumin, ground
- 1 tbsp coriander, ground
- 1 tbsp oregano, dried
- 1 tbsp salt
- 5-6 chiles chipotles in adobo
- 2 bay leaves
- 2qt chicken broth
- 2-3 tbsp oil
Cut onion into large chunks.
Cut meat into 2” chunks.
Place meat and onion into slow-cooker and thoroughly mix with herbs and spices.
(I didn’t have coriander so I substituted a mixture of dried cilantro, lemon pepper, and a touch of nutmeg)
Add chipotles, some extra adobo sauce, bay leaves and broth.
(you want to just cover the meat with broth / liquid)
(if you slice the chipotles the end result will be a little spicier because the pepper seeds and skin will propagate throughout while cooking)
Cook on low ~8 hrs.
Remove cooked chunks with slotted spoon and press to see if it shreds.
Shred all chunks on a baking sheet. (discard remaining broth mixture)
Bake shredded meat ~10 minutes at 400 degrees until meat begins to slightly dry and crisp.
Serve as tacos with corn tortillas, diced onions, cilantro, queso panela, avocado, salsa.
14:16 CST | category / entries / recipes
permanent link | comments?
The Future of Public Transportation in America

Look at this proposed “high-speed rail system” spanning the United States.
It’s an awesome idea to dream and think about, and as a fairly regular traveler between Dallas and Houston (4 hr drive) I had a lot of time to wonder why I couldn’t take a train.
What I realized is that air travel is less “infrastructure-intensive” than roads and rail-road tracks. There is this ~myth~ that train travel will cost $0 and will be totally awesome, but look at existing Amtrak routes and you’ll see that it’s not nearly as cost-saving compared to air travel as you think.
Looking up Amtrak, semi random route (NY to Pittsburgh… the “Pennsylvanian”), is $70-80 one way (Feb 27) and ~9 hr trip. Feb 27 round-trip air returning 1 week later shows ~$120-200 and is between 1.5 and 4 hrs.
With air travel, you have a relatively high fixed cost at individual points / destinations, but zero incremental cost between arbitrary airports. Compared to trains, air travel has a very compelling connectivity and flexibility advantage, compared to building tracks that only one train at a time can ride on between two fixed points.
So while I love the idea of a train network (especially high-speed train), I think that currently air travel has a lot of advantages (quicker, cost-competitive, and is less infrastructure-intensive).
What I’d really love is for Google’s auto-driving cars to take off and have a “virtual-car” / “virtual-bus-system”. Give me a smartphone app, charge me less than $1/mi and guarantee a less than 5 minute wait.
Taking advantage of local road infrastructure for “point-to-point” automated local travel is soooo much better than trying to build a new inflexible train infrastructure to compete with airports for city-to-city travel.
With auto-driving cars you could do some very interesting things with the idea of actual “road-trains” (what 18-wheelers are called in Australia, I think). Imagine a passenger-based 18-wheeler. Automated semi up front, interchangeable 18-wheeler, glassed-in passenger-trailer on the back.
It uses existing road infrastructure and has a far better story for reliability, cost-effectiveness, and flexibility. With point-to-point local travel via “GoogleTaxis”, dropping you off at arbitrary parking lots / concentration points with a few “GoogleTrailers” connecting you quickly and precisely for long-haul city-to-city trips.
And when GoogleAir starts up and you can do point-to-point travel (started / planned from GoogleMaps, of course) charged to your GoogleWallet at insanely low prices, with insanely high customer-satisfaction… well, wake me whan that happens because we’ll be living in the future of public-transit.
22:55 CST | category / entries
permanent link | comments?
Baked Tomato Rice with Sausage
This rice always turns out awesome. Very filling as a side-dish (or meal in itself) and resilient to modification and experimentation.
- 2 tbsp vegetable oil
- 1 onion, chopped roughly
- 1 red bell pepper, diced
- 2 cloves garlic, minced
- 1/2 tsp thyme, dried
- 1 1/2 cups long-grain white rice
- 4 cups chicken or vegetable stock
- 8oz tomatoes, canned chopped
- 1 bay leaf
- 2 tbsp fresh basil, shredded
- 6oz sharp cheddar cheese, grated
- 2tbsp chopped chives / scallions
- 4 herby pork sausages, cooked and sliced
- 3 tbsp fresh parmesan, grated
Preheat oven to 350.
In a large, oven-proof pot that has a cover…
Heat oil, cook onion and red pepper until onion is translucent (~5min).
Add garlic, thyme, cook for one minute more (do not burn garlic).
Add rice and cook for ~2 minutes until well coated and rice begins to turn translucent (do not burn rice).
Add chicken stock, tomatoes, bay leaf and boil ~5 minutes.
You will want the liquid to reduce somewhat, but the rice should still “float”, until it is almost a “soupy” texture.
Stir in basil, cheddar cheese, chives / scallions, sausage pieces.
Cover mixture, transfer pot to 350 oven for ~25 minutes.
Rice will finish cooking in oven, do not check it, but be sure to set a timer.
When rice is done, remove (carefully) from oven and fluff lightly.
Sprinkle with parmesan, return to oven uncovered just long enough to melt parmesan.
Remove from oven and serve directly from the pot.
23:18 CST | category / entries / recipes
permanent link | comments?
Chicken Stock / Tortilla / Chicken Noodle Soup
Another thing I keep bragging about is home-made chicken stock with leftover bones of rotisserie chicken.
Buy and “separate” a fully cooked rotisserie chicken for ~$5-8. Make a meal out of the “bulk” of the meat, pull all the meat you can off the bones and reserve what you don’t eat to put in a salad, make chicken enchiladas, etc. Now that you’ve eaten a good healthy meal using the chicken, if you’d like to use the rest of it continue onwards…
Pull off all the skin / bones / wings and throw it back in the plastic container the chicken came in and keep it in your freezer.
Look in the fridge for all your floppy, shriveled vegetables, ends-of-onions, tops of carrots, etc. Any type of (NON-MOLDY) vegetable junk you’d normally compost, throw those in the freezer too with the chicken bones (I use the same container).
Next weekend you’re going to be in the house all day, here’s how you make chicken stock / chicken tortilla / chicken noodle soup:
- Reserved (cooked) chicken bones (frozen is OK)
- Reserved vegetable matter (frozen is OK)
- 2-3 whole peppercorns
- 2-3 bay leaves
- Chunked onion
- 2-3 cloves garlic
In a large pot, throw everything into it such that you cover with 1-2 inches of water.
Bring to boil.
Reduce to simmer for ~3-4 hours (until liquid reduces by 30-50%).
Here’s the tricky part… strain boiled chicken-juices into a separate container (very large bowl, other large pot), usually using regular colander / strainer.
Strain back into original pot usually through a finer filter (ie: fine mesh strainer).
You now have chicken stock. If you’re not using it right away, freeze into ice-cube trays for use later. To make soup, continue boldly onwards…
So now you’ve got a big ‘ol pot of chicken stock. It should smell pretty delicious. To make chicken soup you’ll need:
- chicken stock (from above, approximately half the pot full)
- small bits of reserved chicken (from original rotisserie)
- random chopped vegetables (carrots, onions, celery, corn, can be frozen / canned)
- bay leaf
- salt, pepper (to taste)
- canned diced tomatoes (rotel or “plain”)
- tomato sauce
- more tomato-flavored things
- 2 cups egg-noodles (optional)
- tortilla chips (optional)
- non-instant rice (optional)
- more chicken (optional)
Into the stock, add tomato, sauces, bay leaves, etc. and bring to boil, reduce to simmer.
While bringing to boil, chop “good” vegetables. If fresh, add early so they can soften. If frozen add a bit later as usually they’re kindof pre-cooked. If canned add very late so they don’t turn mushy.
For vegetables, thicker / harder ones should go in first (ie: carrots), softer ones (ie: celery / corn) should go in last as they cook and soften quicker.
Overall you’re boiling / simmering vegetables for ~30 minutes in total (carrots longer / earlier, corn shorter / later).
Add a little bit of pepper and salt slowly while simmering to your preferred taste, maybe simmering 3-4 minutes between tastings and stirring.
To make chicken noodle soup, at the very end, ~5-10 minutes before the vegetables are softened (according to cooking time on noodle package), add the egg-noodles. (optional). The egg noodles will actually suck up a lot of the liquid overnight, so make sure the soup is extra ~watery~ if you’re going to use the noodles.
To make chicken tortilla soup, add in a cup of rice fairly early with the vegetables and simmer until it softens.
Or, just serve as is, and add tortilla chips, fresh onion, dollop of cream, shredded cheese, more chicken, whatever floats your boat.
The more you make this, the better you’ll get an understanding of what flavors you like and the process you go through. It can be very simple, and might never turn out the same way twice. I use it as an excuse to get rid of and use up almost any type of old vegetables (in the stock part) and finish off any good vegetables you might have (for the soup part). You’ll usually end up with junky vegetables left over, which make great fodder to throw in the freezer for the next time you make stock. It’s an infinite, extremely tasty cycle.
23:03 CST | category / entries / recipes
permanent link | comments?
“Red Wine” Beef Stew
I’ve been making a variation of this stew quite a few times and it has always turned out excellent. It makes a great base for Beef Pot Pie or just in bowls by itself. You’ll have to refer to the original link for the original instructions, I’ll reproduce here my variation on it since I’ve been bragging about it to friends and family.
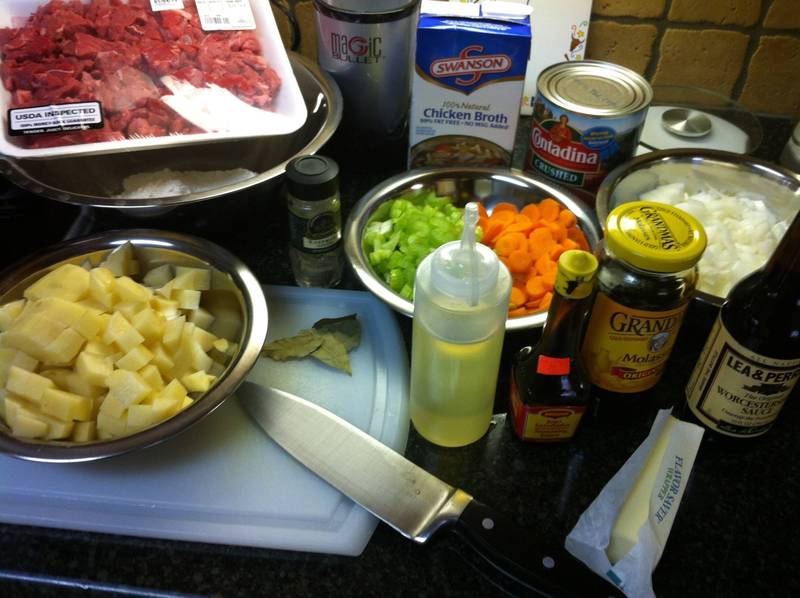
- Kosher salt and freshly ground black pepper
- ~4+ tbsp all-purpose flour
- ~2 lbs beef chuck for stew, cut into 1-inch cubes
- ~3 tbsp butter / oil
- ~1 cup carrots, sliced thin
- ~1 cup celery, sliced
- ~2 cup onions, diced
- ~4 cups chicken broth
- ~3 sprigs fresh rosemary / ~2 tsp dried / crushed
- ~2 cups dry red wine (optional)
- ~1 cup canned crushed tomatoes
- ~2 bay leaves
- ~1 tsp worchestershire sauce / A-1
- ~1 tbsp soy sauce / “Salsa Maggie”
- ~2 tbsp molasses
- ~3 cup russet or Yukon gold potatoes, cubed, ~1/2 inch
- Pillsbury Croissant Dough / Frozen Pie Crust
- Loaf Pan / Casserole dish
Use large (~6 quart) stock pot.
Mix flour, salt, and pepper (to taste).
Flour beef and brown in butter / oil over medium heat.
Try to have only one layer of meat on the bottom of the pan at a time, it has taken me two batches where you have to flour and add oil each time.
You will see the flour begin to “toast” at the bottom of the pan so it begins to form a roux… but avoid burning it!
Remove beef and reserve.
Add more butter / oil, veggies (carrots first), and the remaining flour from the meat.
The veggie measurements are more “ratios” than exact measures, depending on how hearty you like your stew.
Stir to coat vegetables in flour and oil, cook until flour begins to disappear.
Slowly add a small amount of chicken broth, scraping the toasted flour from the bottom of the pan to integrate it with the broth.
Continue slowly adding broth, scraping clean the bottom of the pan.
Add wine (optional), tomatoes, rosemary.
If not adding wine, be sure to add more liquid… wine, broth, beer, tomatoes, whatever.
To flavor the broth to be “beef-appropriate”, add the “Salsa Maggie” / soy sauce, worchestershire / A-1, and molasses.
Bring to boil, skim any “foam”.
Add reserved beef, bring to boil.
Simmer ~45m, stirring occasionally.
Add cubed potatoes, cover, simmer 45m more, stirring, occasionally.
To make “Pot Pie”
Arrange croissant dough at the bottom / sides of the loaf pan.
Bake 350F ~5-10 minutes to firm dough.
Scoop in hot stew on top of partially baked dough.
Cover with more dough.
Return to oven at 350F until top is golden brown.
If using a casserole (or in any case) you can omit the bottom layer of bread / dough and just cover the top and bake until golden brown.
14:50 CST | category / entries / recipes
permanent link | comments?
Like what you just read? Subscribe to a syndicated feed of my weblog, brought to you by the wonders of RSS.
