Vim has a terse syntax and focus on editing structured text. Vim in itself is almost a programming language for editing text in the same way that regexes are a programming language for matching patterns.
Each command Tn vim is like a command in any other programming language. “d[motion]” - the delete function takes a motion parameter. Vim is actually an IDE for editing text. Knowing that VIM replaced line-oriented editors with a full-screen editor helps understand the emphasis on efficient movement and changes, especially focused on edits that happen on one line. (that’s why the “U” command exists. :help U).
Basic Repetition
Basic command repetition is done with “.” (period) which repeats the last edit. I am forever using “df,….” (delete find comma, repeat) to delete a bunch of parameters from a function list. If I were smarter I might use “dt)” (delete until right-paren) but using the period repetition is already a big win.
Repetition is extremely useful but it has a pretty severe limit- if you need to repeat an edit that doesn’t fit into exactly one of the basic editing commands or and edit that spans multiple lines, you can’t use repetition and usually have to upgrade to using vim macros.
Why Use Macros
Macros are easy in the way that bash shell scripts are easy. You just do your normal shell commands (or vim commands) and then save and play back those same commands later. Start macro recording with “q[register]” usually: “qa” and play back with “@a” to play a register or “@@” to repeat the last played back macro.
Let’s pretend that we need to rename all the params.icon_url to match the case of the function that is on the right (ie: “icon_url” becomes “iconURL”).
If I were to do this normally, I’d navigate to the “iconURL” line, copy that word and paste it over the “icon_url” spot. Pretty easy to do with mouse and keyboard, double-click, ctrl-c, double-click, ctrl-v.
Pretty common operation, and easy to do for one function, but it would be a pain if we had to do it in multiple places.
Basic Macro
Now let’s do the same thing but with a vim macro: “/iconURL<cr>qa02f.lyt(0f.plct= <esc>q”
Actually, let’s explain the macro that I would have recorded
/iconURL<cr>       - find iconURL ... nothing strange here

qa                 - record (q) into register (a)
0                  - go to beginning of line
2f.                - find the 2nd "."
l                  - cursor over one
yt(                - yank until the paren
0f.                - back to the beginning, find the first "."
p                  - paste it
l                  - cursor over one
ct= <esc>          - change until the "=" with a space
q                  - end macro recording
This is likely different from your normal interactive editing pattern. You’ll notice the excessive use of “0” to go to the beginning of the line. Using “0” tends to make macros “durable” in that you know you are starting from a known-good spot.
There is also a lot of exploitation of the structured nature of this text. The lines in question all have “.”, “=”, and “(” so a lot of the edits are based on those key structural points. Instead of “xxxxxx” to delete text a bunch of text, you would use dt( to delete until the parenthesis. By exploiting the structure of the text, you can repeat the edit on similarly structured lines.
So… play along at home and load the same text up in your editor. Record the macro then undo all your changes and play them back. If you play back the macro on the same line, everything should work out fine. The question is whether it works for more than just the line you recorded it on.
Playing Back Macros
Macros are recorded with “q<register><commands>q” and played back with “@<register>”. By convention people will usually use the “a” register because it’s quick and easy but you can actually record and playback macros into and out of any register you’d like.
Move down to the “replace_id” line and play back the same macro (@a). You should see that as expected, “replace_id” is replaced with “replaceId”. If it’s not you need to try to figure out why, usually by re-recording a similar macro or trying a different macro tactic entirely.
It takes practice to record good macros but they save a lot of time and use all the same editing commands you already know.
Macro “Musts”
Macros just replay the exact keystrokes you use when editing, so what could be so difficult about macros?
The two tricky parts about recording useful macros are both related to repeatability.
You’ll see in the above example macro I continually go back to the beginning of the line with 0 . In some cases this is not strictly necessary but by starting at the beginning on the line forcing all commands to be relative to the beginning of the line, it is much more likely that the macro will work on subsequent lines.
Another common tactic I’ll use is to include either a “j” or “n” as the last command in a macro. This allows the macro to be easily repeated on every line that is necessary.
“j” will let you run through a contiguous block of text very quickly (ie: messing with log files).
“n” lets you mach search terms easier (ie: search for and modify function calls).
In both cases if the macro takes care of moving itself to the next spot you can run it back to back with 100@a (run macro a 100 times) or @@ (special notation to run the last macro again).
Ways to use Macros
The final “hail to macros” suggestion I’d like to make is around recording different macros and binding them to different keys. Bind the macro you just recorded to “F1” by typing :map <f1> @a. Now when you press F1 it’s as if you typed “@a” to run your macro.
I am forever doing stuff like this when making complicated edits across many files. As an example, I might need to go through and tag certain function parameters as “isNumber( … )”, or “isURL( … )” or “isHTML( … )”. The thing that requires brain-power is determining what validation needs to go on the function parameters, but the edits are pretty structured.
I’ll queue up the “add isNumber()” macro into F1, the “isURL()” macro into F2 and “isHTML()” into F3. Then it’s simply a matter of:
Working with the same code above we can record the isNumber(…) macro (and leave the isHTML, isURL up to you). Reset the text and record the following macro:
qa                  - record (q) into register (a)
0                   - go to beginning of line
f=                  - find "equals"
laisNumber( <esc>   - add "isNumber"
$x                  - delete final ";"
A );<esc>           - append the closing function stuff
0                   - back to the beginning, just for good luck
q                   - end macro recording
Now you record similar isNumber, and isURL macros into “b” and “c” respectively. Finally:
 :map <F1> @a
 :map <F2> @b
 :map <F3> @c
Now you can move through the block of code and easily tag each line as “number, URL, HTML” depending on what it needs to be. This macro is relatively simple and there are likely better / easier ways to do perform this specific task, so don’t get bound up in this specific example but instead focus on the overall strategy of using your brain for what it is good for and using macros to take care of the editing / typing parts.
Hopefully this gives you a taste of how and why you can integrate vim macros into your workflow. Once you’ve mastered macros you’ll probably find a lot of uses for them. I find that I reach for sed and awk a lot less because with vim I have a lot of the same power (sometimes even more!), and I can preview my changes a few times until I get it working right and then repeat it as necessary.
Kindof frustrating that there’s not some whizzy gui checkbox to do this, but I guess it is not a common thing to be doing.
Doing the basic cat /dev/audio > /dev/dsp didn’t quite work- was very scratchy and just not acceptable… I don’t know if it has to do with codecs or anemic netbook performance but I’m glad I could find an answer that worked.
Actually this recipe is a bit of a lie, it requires a pot and a frying pan if you don’t prep the mushrooms in the soup pot.
1 to 3 tbsp butter
1 onion, finely chopped
1 celery stalk, finely chopped
25 large sage leaves, finely chopped
4 tbsp all-purpose flour
5 cups turkey or chicken stock
3.5 oz / 100g rice
9 oz / 250g mushrooms, sliced
7 oz / 200g cooked turkey
3/4 cup heavy cream
serve with freshly grated parmesan cheese
Chop onion, celery, and sage leaves. Sautee with butter in soup pot (standard medium mac and cheese pot will be a little tight but should work) until onions turn transparent.
Stir in the flour (approximately a third at a time) and continue cooking for ~2 minutes (should begin to turn brown and stick a bit to the bottom of the pan).
Add ~1 cup of the stock (a little at a time), scraping the flour from the bottom of the pan and combining with the floured vegetables. Add remainder of the stock and mix completely.
Stir in rice and season to your taste, bringing just to a boil.
Reduce heat and simmer partially covered for ~30 minutes until rice is just tender, stir occasionally.
Meanwhile melt cook mushrooms with butter in a separate skillet for ~8 minutes, seasoning with salt and pepper.
Add mushrooms to the soup. Add turkey to the soup and stir in cream. Simmer ~10 minutes more until combined and heated through. Taste and season as necessary.
Serve in warm bowls and garnish with grated parmesan cheese.
I’ve made this soup twice in a row, never to the real recipe. Since sage is tough to find I substituted standard dry/rubbed sage and chopped up some parsley for the leafy parts. I also used chicken instead of turkey but with the holidays coming up, this would be a great way to use up turkey leftovers.
Since I don’t like mushrooms I at first tried substituting a finely sliced, quartered, and seasoned potato slices. The first time I actually used 4 cups stock instead of 5 cups and let the soup boil a bit too long, boiling off some of the liquid. Bad news. It really does better with more liquid and could probably even stand another cup of stock so don’t be shy with it.
That’s also the reason it says 1 to 3 tbsp butter. I’ve been using extra celery and onion and 2 tbsp of butter instead of half the butter with one stick of celery and half the butter with the onions.
Second time I ditched the potatoes (they were a bit ~off~ when mixed with the rice) and also omitted the cream. Making it less creamy chicken soup and more like a traditional chicken soup. But with the flour and the cooking time / style it plumps up nicely and stands really well on its own.
If you want to stick to the true “one-pot” style, definitely cook the mushrooms ahead of time and reserve in a measuring cup or something. If you don’t have a turkey, we grabbed a rotisserie chicken and were able to make a few meals out of it and I’m excited to save the bones to make my own stock next.
As it is, I think I will permanently drop the cream and mushrooms, making it a basic “Chicken and Rice” soup.
After a service call to Appliance Rescue, and a diagnosis of “Faulty Main Control Board and/or Analog Pressure Switch” from Mitch I got a quick edumacation about my washer machine’s model number, serial number, parts numbers, service guides etc. and had to dig out the quarters for the laundromat for a while.
Main control board came in last night and after attempting to disassemble the whole front panel, it turns out that (like the song) you can just “Slide to the Left” and the control board pops right out. Unfortunately changing the control board didn’t fix the problem (d’oh) but fortunately the Analog Pressure Sensor Switch came in 12 days earlier than promised (they told me it was been backordered but I guess we got lucky).
I had it installed with just a hop, skip, a jump, and a T20 bit and am currently running through a first test load of laundry. Yay!
I can now add “Appliance Repair - Washing Machine” next to my “Car Stereo Installation” Merit Badges. Feels pretty good to be able to fix stuff and a huge shout out to Dave from ultimate for putting up with my questions.
…and have some type of keyboard navigable menu popup or selection tool, very similar to how vim’s “:Explore” mechanism works.
After thorough investigation, the winner of best(?) way to make a popup menu is as follows:
select f in aaa bbb ccc ddd ; do echo $f ; break ; done
It isn’t actually a popup menu per-se but you get the best bang for your buck as far as using standard unix-isms and it is pretty much universally available since it’s a bash builtin. Wrapping it in a simple shell script is easy to do wherever you are and means you can reliably integrate its benefits into your workflow.
    $ cat ~/bin/menu.sh
    #!/bin/sh
    ALL=`cat`
    select FOO in $ALL ; do echo $FOO ; break ; done

    $ ls /usr | ~/bin/menu.sh
    1) bin      3) include    5) lib64    7) sbin    9) src
    2) games    4) lib        6) local    8) share
    #? 2
    games
In actuality though, you want to use the “select f in …” idiom as a fallback for when the dialog command isn’t available. The following shell / dialog script is kindof ugly but gets the job done as far as providing the same inputs and outputs as above but with a more comfortable user interface.
    $ cat ~/bin/gui-menu.sh
    #!/bin/sh

    # get stdin
    ALL=`cat`

    # number the lines
    SPLITTED=$( echo $ALL | sed 's/ /\n/g' | awk -- '{print NR, $0 }' )

    # prompt via dialog (output-fd=1 is so that dialog gui doesn't go to subshell)
    OUT=$( dialog --output-fd 1 --ok-label Select --menu Choose 0 50 22 $SPLITTED )
    EXIT_CODE=$?

    # handle escape / cancel buttons
    if [ "1" = "$EXIT_CODE" ] ; then exit 1 ; fi
    if [ "255" = "$EXIT_CODE" ] ; then exit 1 ; fi

    # extract text corresponding to user's numeric selection
    CHOSEN=$( echo $ALL | sed 's/ /\n/g' | awk -- "NR==$OUT {print \$0 }" )

    # print result
    echo $CHOSEN
…it is used exactly as the above “menu.sh” but prompts with an ascii dialog gui instead of numerically. It’s relatively easy to expand the above to allow dialog multiple checkboxes (very inefficiently, probably n^2-ish in the below implementation), which is shown here:
    $ cat ~/bin/gui-multiselect.sh
    #!/bin/sh

    # get stdin
    ALL=`cat`

    # number the lines
    SPLITTED=$( echo $ALL | sed 's/ /\n/g' | awk -- '{print NR, $0, 0 }' )

    # prompt via dialog (output-fd=1 is so that dialog gui doesn't go to subshell)
    # --checklist  v.  --menu is the key differentiator here
    OUT=$(dialog --output-fd 1 --ok-label Select --separate-output --checklist Choose 0 50 22 $SPLITTED)
    EXIT_CODE=$?

    # handle escape / cancel buttons
    if [ "1" = "$EXIT_CODE" ] ; then exit 1 ; fi
    if [ "255" = "$EXIT_CODE" ] ; then exit 1 ; fi

    # loop through selected numbers
    for X in $OUT ; do
        # inefficiently print out the text corresponding to the selections
        CHOSEN=$( echo $ALL | sed 's/ /\n/g' | awk -- "NR==$X {print \$0 }" )
        echo $CHOSEN
    done;
And third place goes to Joey Hess’s “vipe” interactive pipeline editor (from “moreutils” package), which lets you edit a pipeline and pass its output back out.
echo `grep ^foo /usr/share/dict/words | vipe`
The above command isn’t quite a dialog box (can’t just use up / down arrows and press enter, actually have to delete all the lines you don’t want and “:wq” out of the file) but it is useful because it handles both interactive single and multi-select use cases and is just an all around interesting tool.
For a true GUI selection, zenity looks like a winner as far as ease of use compared to dialog and xdialog … dialog unfortunately doesn’t “ad-hoc” very well but combining the above dialog scripts with a “select f in …” fallback is what best matches my needs.
If it’s not immediately obvious as to why you might want to use a menu, you’re just not thinking lazily enough…
It frequently comes up that I’m writing little utilities at work to do various things. I’ve gotten into the habit of adding at least “usage: …” and “—help” options to almost every program I write because life is too (short|long) to be re-reading the source code to figure out what a program or utility does.
I usually end up doing a bunch of “ls —help”, “grep —help”, “cat —help” to triangulate what the help and usage lines for a typical program might look like, but I have come across some guides that begin to codify what unix “feels like”, and look to be extremely strong references to point to when trying to figure out the best way to write a program or how to pick names for command line arguments and options.
Forver and a day I am trying to figure out what to name my program options and these two guides definitely help. It allows me to definitively say you should use -c … for “command” instead of -r … for “run” because -r means recurse or reverse.
“I wish to learn the Great Way of Unix”, he said “but the command line confuses me”.
Master Foo turned to the end-user. “Tell me”, he inquired, “why do you seek the
Way?”
“I am discontent with the software I see around me”, the end user replied. “It
neither performs reliably nor pleases the eye and hand. Having heard that the
Unix way, though difficult, is superior, I seek to cast aside all snares and
delusions”.
Whenever you can, follow the above guides so that your software is reliable and pleases both the hand and the eye. Think of the end user (even when that end user is yourself) and you will be enlightened.
don’t understand why it’s important to notify users of SSH server fingerprint changes
They’ve been fairly low maintenance but nuking my crontab goes a bit too far. I mean… the whole point of cron is that it takes care of stuff so you don’t have to worry about it. Then bam. It’s not running for no good reason. Wow. Good job, guys.
When unlocked and the phone rings, the lower-left-to-right swipe gesture you normally use cancels the call instead of answering it. To fix, make the unlocked “answer call” button full wide green in the “slide to unlock spot” and the red “ignore call” button full wide red just above it.
There is only one default ringtone. I would prefer adding a “Default Unknown Number Ringtone”. That way you have your 2-5 “priority” ringers, your default ringer, and then your “unknown” ringer. Would be a life-saver when getting random wrong-number calls and you’re trying to chase down your phone to answer the call.
In addition, the iOS4 update nuked the “double-tap for favorites” feature. There’s been some talk of a “triple-tap for favorites” instead of mapping that to some accessibility feature I don’t know about. Tap-and-hold for voice dial isn’t quite a good enough replacement, and there is no “soft-button” I can put in the dock that reliably gets me directly to my list of favorites. Doesn’t anybody at Apple realize that people only ever call like 5 other people?
Finally, fix exposé in Snow Leopard. [X] Scale Windows Proportionally. Yes this means you have to translate “proportionally” into 57 different languages but you can do it. I have faith.
I try to avoid editor advocacy as a rule but when I do see people using vi/vim, I am an advocate of squeezing out some of its potential.
Most introductions to vim focus on getting you able to type words in and move around in the file and neglect to mention that vim has “physics”.
The two primary physics of vim that I’m aware of are:
motion - like “hjkl” (one character in any direction) while in normal mode.
edit - like “ifoo[esc]” (insert foo at current cursor position) again while in normal mode.
Secondarily, you have some extra stuff related to:
viewport - like “zt” (zoom cursor to top) while in normal mode
commands - like “:%s/a/b/g” (substitute all ‘a’ characters to ‘b’) in “command” mode
“normal mode” commands - like “y”, “p” (yank, paste)
register modification - like “”ay” (register: ‘a’, yank)
Basically anything that changes the text when you start it from normal mode is an edit. Anything that changes your cursor position but doesn’t change the text is a motion.
Things that don’t move your cursor, don’t affect the text, and just change what shows up on the screen are viewport operations. Commands/registers are where you get into the dark underbelly of vim’s power. I mention them here like you would mention calculus in an algebra class… it’s important to know that it’s there so you can hand-wave and say: “You’ll learn why this thing behaves funny later on”.
Viewport Operations
The simplest of these things to explain are the major viewport commands although most people are not even aware of them.
z[cr] / zt - zoom / move cursor to top of screen
zz - zoom / move cursor to middle of screen
zb - zoom / move cursor to bottom of screen
[c-y] - shift view line up
[c-e] - shift view line down
[c-b] - shift view page up
[c-f] - shift view page down
These are the simplest because they don’t actually change anything in the file, they don’t change your cursor position, they don’t change text, they are basically invisible in the “editing physics” of vim. If you work with split windows then this also includes things like the commands. Since they don’t affect any kind of state of vim that we care about we can ignore them.
Motion Operations
The next simplest thing to explain is motion. Key point here is that ANYTHING THAT MOVES YOUR CURSOR (that isn’t an edit) IS A MOTION.
hjkl - motion, move cursor
←,→,↑,↓ - motion, move cursor
0,$,^,[home],[end] - motion, beginning, end of line
/foo[cr] - motion, search
fa,ta - motion, “find ‘a’” / “until ‘a’”
w,b - motion - next, previous word
HLM - motion - High, Low, Middle move cursor
*,# - motion - previous, next search word under cursor
n,N - motion - next, previous search
etc, etc, etc.
The interesting thing is that there are so many different motion commands. That’s why when you see an experienced vim user, they jump around in a file like their cursor is under mind control. With so many different ways to move around it pretty much is, and without using the mouse and without relying on keyboard repeat.
The counterexample to this is how basic editors require you to mash down the right or left arrow, overshoot the point in the line you’re looking for, tap tap tap backwards in order to get your cursor where you want it, then start typing or deleting, etc. Basic editors only allow cursor motion via arrow keys or mouse clicks which is severely limiting compared to the number of ways you can move around in vim.
When I’m looking for “the beginning of the function” in vim, I do “/function foo[cr]” and it takes me right there. If I want to get the beginning of the function arguments list, I do “f(” (find left-paren). No no holding down the right arrow, no moving my hand to the mouse, no popping up a dialog box. I’m just right where I want to be.
Motion is the workhorse of vim and one of the big advantages of using vim compared to any other “basic” editor.
Edit Operations
Honestly, editing in vim is kindof boring.
iIoOaA - basic ways to get into insert mode
R - get into replace mode (overtype)
r - replace one character
c[motion],d[motion] - change / delete text
pP - paste text
. - repeat last edit
3 - repeat the subsequent edit 3 times
If you’re paying close attention you’ll see that the “c” (change) and “d” (delete) commands take a parameter. Since motion is the workhorse of vim, there is zero friction between being about to move somewhere and being able to describe an edit that changes precisely what you want changed.
Going back to the example of finding a function (/function foo[cr], f(), if you want to move to the end of the function argument list, f) (find right-paren). If you want to df), you’ve just done an edit to delete until you find a paren. If you want to change what’s in there: cf). The “move” is f), the “edit” is either “d” or “c”. Zero friction between moving and editing.
This cannot be overstated: Learn your motions.
Motion is a fundamental “physic” of vim. As universal and inexorable as gravity, motion magnifies both your editing speed and your editing power. Speed because you can get your cursor precisely where you want as quickly as possible. Power because the basic editing tools of “c” (change) and “d” (delete) take ANY motion as a parameter, even the usually useless ones.
Take for example “HML” (move cursor to high, medium, low position on the screen). “dH” deletes from wherever your cursor is to the top of the screen. Why would you want to do that? I have no clue. But because “d” doesn’t care, it just does what you say to. Delete the motion.
A more relevant example might be: “Hd/foo[cr]”. Go “high” then delete everything until “foo”. Remember, search is a motion because it moves the cursor!
Motion in vim is your key to speed and power.
Repetition
The other interesting thing about editing in vim is that if you can find a way to compose your goal in a single “edit” (ie: I//[esc] insert “//” at the beginning of the line), you can repeat that same edit by moving somewhere, then pressing the . (period / repeat) key.
That becomes incredibly useful when commenting things out, when changing “FooType a;” to “BarType a;” in selected places… just queue up the change that you want (cwBarType[esc], do some searches (/FooType[cr]), hit “n” (next) until you find the right ones, then “.” to make the change. “nnn.n.nn.”. Next next next, change, next, change, next, change, next, next, change. It’s quick, useful, and reduces the possiblity for simple typing errors. You’re taken directly to the spot you want to evaluate, and the only button you have to push is “.” in order to repeat the same change you made before.
The naysayers will say “well my editor has a dialog box for search and replace”, which is all well and good. But the repeat “.” command allows you to repeat any edit. And many edits can involve arbitrary motion commands, meaning you’re not limited to replace AAA with BBB, but you can use the “cw” (change word) or “df,” (delete finding a comma) edits which is strictly more powerful than the usual simple search and replace dialog.
The repeat command (prefix an edit or a motion with a “count”) is interesting to explore too. “80i-[esc]” will repeat the “insert a single dash” edit 80 times. “i-[esc]79.” or you can insert the dash once and then repeat the edit 79 times. This works equally well with “J” or “d” or any other editing command. Although the results might not be useful, vim won’t stop you from doing it.
For things that are “too big” for one simple edit, you end up getting into macro-recording (“q, @”) which isn’t very complicated but doesn’t actually fit into the category of “editing”.
Commands, Registers, other “modes”
That leaves commands, registers, and other “modes”, all of which most people can live without in the sense that if you know “enough” about visual selection, and a basic “:%s/foo/bar/g” you’ll get by just fine.
Do some reading on “:help modes”, take a peek at “:registers” and “:help registers” as well as “:help recording” and “:help macro” if you’re interested in yet more tricks to speed up certain editing operations.
Summary
What helped me the most when learning vim was the advice: “Think Bigger”.
In most other editors, you think in mashing letters to insert them and the biggest motions you have are page-up and page-down.
Vim is different and especially powerful because it lets you think in terms of characters (hjkl), words (wbe), sentences (()), paragraphs ({}), programming blocks (vi{, vi(), etc.), precisely “find me then next ‘y’ on this line” (fy, Fy), and hugely (ggdG), usually with tremendous precision and no more than a few keystrokes.
Instead of thinking “I need to delete about 100 characters” think “I need to delete until the end of the line (d$)”.
Instead of thinking “I need to highlight a bunch of lines” think “I need to select the contents of this block (vi{)”.
By training yourself to think bigger you’ll eventually be able to edit better.
Pandora is rocking out with some afrolatin, flamenco, acoustic influenced music (with minor key tonalities, obviously) based on Rodrigo y Gabriela. streaming music with a brain, a great way to discover new music based on what you already know
$ google calendar add "buy tickets today at 2pm"
Please specify user: ramses0
Please log in and/or grant access via your browser at https://www.google.com/accounts/OAuthAuthorizeToken?oauth_token=.........&hd=default then hit enter.
it’s the cloud!!! in my pocket!!! from my terminal window!!!
From the annals of history, specifically the Cookbook of the Lutheran Nursing Home of Brockton, Massachusets. A recipe by one Phyllis Peterson.
4 tbsp flour
2 tbsp butter
2 cup tomato sauce or juice
1 cup grated cheese
salt, pepper
4 fish fillets
Blend flour and butter. Stir in tomato sauce. Add cheese when thickened.
Arrange slices of fish in a baking dish. Pour on sauce.
Bake at 350 until tender, about 350 degrees.
Serves 6.
I had to take some liberties… it’s not clear but I think you’re supposed to heat the tomato sauce (as if you’d boiled + pureed, etc) since it talks about thickening. I went ahead and literally blended the flour + butter (made into a paste) but perhaps you’re supposed to sauté or brown and then add the tomato sauce.
I have to admit the unedited version is more entertaining, but I’m saving it here so I can try out at least one of the recipes (pork shoulder, safrito, tostones).
Take a lesson from the Puerto Ricans. Millions of us have managed to survive in
one of the most expensive cities on earth with recipes like this:
Find a supermarket that has black beans on sale. Buy as much as you can. Then
buy 5 or so pounds of Carolina rice, a bag of onions, a few bulbs of garlic,
and a box of Goya Sazon.
Bring 2 cups of water to boil
Throw in one cup of rice, turn the heat down to simmer and lid it
Slice up a small onion
Smash up a clove of garlic
Throw some olive oil or butter into a HOT pan.
Throw the onions and garlic into the pan and fry them till the onion gets
glassy. Throw some salt in there.
Grind some pepper in there for good luck.
Toss in half a packet of Sazon and stir till you get a paste. Now you have a
sofrito.
Dump in your can of beans bean juice and all.
Stir it up.
Add a pinch of Cayenne pepper so you remember that you have a set of cojones
Set it on simmer
Your rice is done.
Throw the beans on top.
Win
You should get at least 2 meals out of one can of beans, and if your lucky you
can get black beans 2 for $1. Adding the cost of the Garlic, Sazon and a small
onion and you still eat a tasty, hearty, relatively healthy meal for less than
$1.
Now. You are a growing lad. You need MEAT
OK, first of all, forget eating lips and rumps. There is a much, much tastier
option that has kept millions of starving boriquas alive for generations: PORK
SHOULDER.
In my neighborhood in Brooklyn, Pork shoulder is 79 cents a pound. That’s
right. 79 cents. A package of hot dogs at $2.50 is more than double the price
and has offal and all sorts of vile stuff inside.
Buy yourself a nice meaty pork shoulder. 5 lbs should do nicely.
Bring it home and get out a long, thin knife.
In a pilon (that’s a mortar and pestle, gringo) smash up a few cloves of
Garlic, some sazon, some, salt, some pepper, and some oil. Grind it up GOOD.
Now you have another sofrito.
Take your knife and stab some holes in the pig. Twist the knife around so the
holes get nice and wide.
Now, take some of your sofrito and stuff it into the holes. Don’t be shy
blanco, ram it in there. Use the remainder to roughly coat the outside of the
pig. RUB IT. CARESS IT. This pig died so that you may eat. Salt it all over the
outside and crack some pepper on there.
Set your oven for ~300 degrees
Throw the pork in skin side up and WAIT.
It’s going to take like 45 minutes a pound…
A warning: The smell is going to drive you INSANE. You have to wait
this part out. Farm work is the best cure.
After an an hour and a half, jab it with a meat thermometer, but remember to
not rest it on the bone, or you will get a bad reading.
You should be at around 150-160 degrees. Now comes the fun part. CRANK the
stove up to 400 degrees. This will give you an orgasmic, crispy skin that will
make your pork rinds taste like year old carboard comparison.
At 170 ish? Pull it out, but DON’T carve it up. You need to wait at least ten
minutes otherwise all those sweet, sweet pig juices will dribble out. WAIT.
Congratulations. You just made Pernil. A five pound Pernil should give you meat
for at least a week. SAVOR IT BROTHER. SAVOR IT
Edit: Forgot the best and cheapest recipe!!!
TOSTONES!!!!!!!!!!!!!!!!!!!!!!!!!!!
Green plaintains are usually like 5 for a dollar!
Here’s my mom’s recipe:
Fry up some bacon. Set the bacon aside and save that lovely, glistening fat.
Take a plantain and run a knife down the side and split the skin off without
breaking the plantain. This takes a bit of practice.
Slice up the plantain into ~1/3 inch thick slices. Throw them into a bowl of
ice water.
You have a fry daddy? You’re golden papi. No? Pour around half an inch of oil
into a frying pan. Corn oil works best, olive oil smokes too easily. Get it
hot! Throw in your bacon grease.
Take your sliced up plantains out of the ice water and drain them or even pat
them with a paper towel till they’re dry.
Fry them until they just turn golden.
Throw them in the freezer for 10 minutes.
Now, here is where you become a MAN: Get yourself a flat bottom glass and a
cutting board or a plate. Throw some flour on there. Smash the plantains with
the cup. You may need a spatula to get them off the board…
Fry em AGAIN until they are golden and crispy
Make all three of these things together and you have an incredibly delicious
and cheap meal!
TLDR; Learn the lessons of my people: The Nuyoricans. (New York Puerto Ricans)
We have survived for DECADES on no money in one of the most expensive cities on
the planet.
Some people want to upgrade for the sake of upgrading, and I am the
opposite, like if it aint broke don’t fix it mentality. Do you have
any useful articles on the subject?
I wasn’t able to come up with anything that matched exactly what my thoughts were so that means I get to write them down.
The benefits of upgrading are generally:
new bugfixes (especially security)
access to new features
generally smaller integration work
The disadvantages of upgrading are:
stuff breaks
new bugs
existing features change
upgrading takes time
minor updates might not be as well tested
You still eventulaly have to upgrade but frequent upgrades can leave you with more doubts and questions than the benefits they provide.
The sentiment I was looking for and couldn’t find was that if you have Automated Acceptance Tests for new releases of Third Party Libraries then you can upgrade as often as you’d like.
Consider a situation that I lived through at a previous job. The company I worked for was integrating with a commercial third-party library and every code drop alternately caused or fixed an arbitrary number of bugs. It was really slowing the project down (because the third-party library was not yet finished but provided key functionality to our company’s project), integrating with these code drops chewed up a lot of testing and developer time and caused a lot of uncertainty when there were any problems.
One of the developers then wrote some automated acceptance tests around the third-party API. Calling these three functions in this order and it should have a certain behaviour. Calling a different function should have this other affect. When code drops came in that did not meet the automated acceptance tests, he was able to reject the library releases within minutes instead of taking on that new, unknown instability for no benefit.
In a well-functioning system, these are basically the same thing as automated unit tests but in a lot of cases when you receive a library you don’t receive the unit tests. In addition if unit tests are added, removed, or changed, it might be difficult to know if the library in question has changes that are worth knowing about or whether the changes are irrelevant to how you are using the library.
In the absence of your own Automated Acceptance Tests from a consumer / customer perspective, a thorough system-level or integration test can suffice because it will generally point you to the problem areas. In certain cases though, the return on investment of writing your own customer-managed Automated Acceptance tests are a huge plus… especially with relatively unstable or immature libraries. In the open-source world, they are especially valuable to contribute back upstream, as then your specific use cases will be much less likely to break (vis the old SpikeSource, which used to make money selling extra-tested packages of open source software).
And if you’re not even in the door with automated testing (either your own unit or “sloppy integration”) you’ll get the best ROI investing in post-deployment tests, a good staging environment, and the ability to test out whether a certain underlying software upgrade is going to break your system or make it “better”.
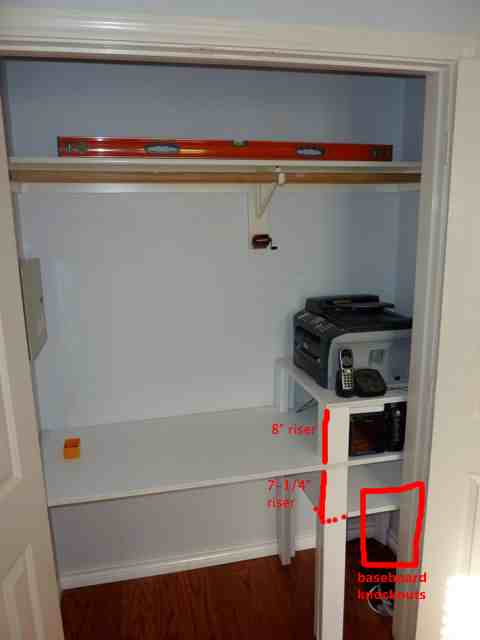
I started planning some shelves for my office closet a little less than a month ago. It’s a fairly large closet and none of the electronics are real heat-hogs so I’m not too worried about ventilation. I mostly wanted a place to hide the printer (and router, and external hard drives) along with a work-surface to either throw down a laptop or work with printouts / copies when I need to be doing that type of stuff.
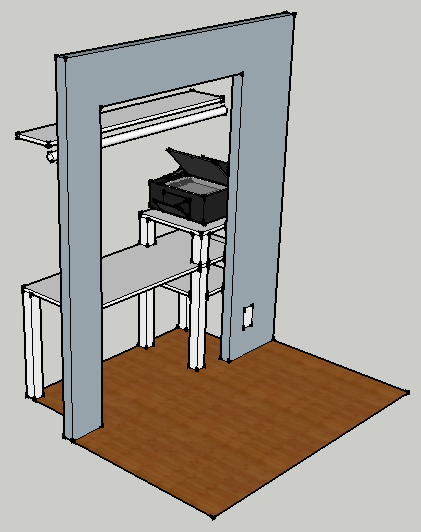
Final SketchUp Design
Major differences between the inital design and my final were changing the left-most mounts to be a cleat instead of legs and changing from universal 3” posts to “ell” constructed 2x4’s + 2x2’s. It turns out that 3” posts are only carried in my imagination and that posts sold at Home Depot are 4”, which felt entirely too bulky for what I was doing.
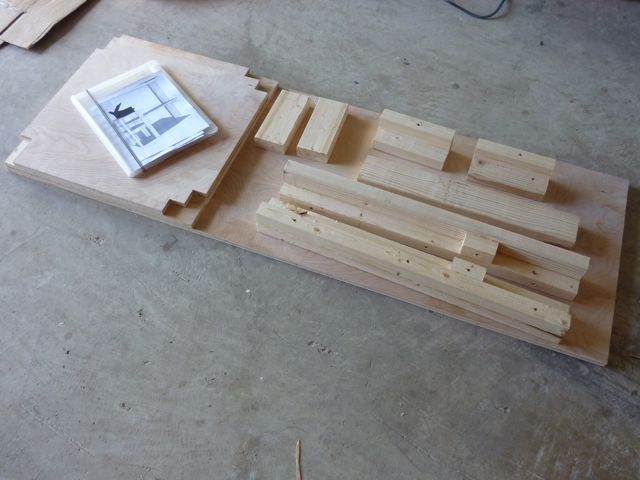
Cut Pieces
Before going to Home Depot for the wood, I planned and wrote out my parts list based on the sketchup design and a final set of “accurate” measurements. This was really helpful when I needed to figure out how many linear feet of 2x4’s I was going to need and what size board I needed to buy.
I ended up splurging a bit on the top plywood and got one with the smooth birch veneer because I knew I might be using it as a light-duty desk surface. It was only a few dollars more but has a nice smooth feel to it although you have to be careful about shredding the veneer when cutting.
I did all cuts with a basic circular saw and a hand-saw for detail/final removal (ie: when cutting out the “ell” sections from the bottom shelf). I can’t overemphasize the helpfulness of clamps and long, straight levels.
I don’t have a table-saw, so to make the longest cut I snapped a chalk line (straight), used two levels and some scrap wood along with some bracing to keep all my straight edges “in line” while running the circular saw down the board. Originally I had planned on using the 2x4’s but they were nowhere near straight over a 5-6’ run.
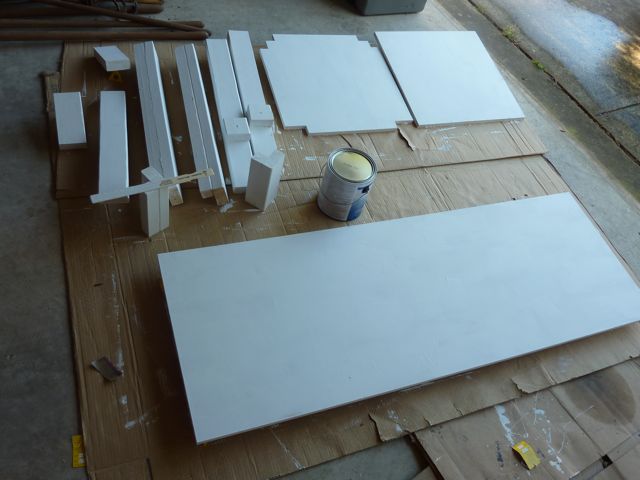
Primed
After all the piece-assembly I was left with your basic ikea-style furniture pack. I ended up priming everything twice, then another two coats of white latex glossy (standard “trim” paint) and it came out acceptable. It would have been nicer to keep the dust down as I ended up with some random crap on the large surfaces after the first glossy coat. I sanded some of that down then did the final coat with the garage door closed which helped quite a bit.
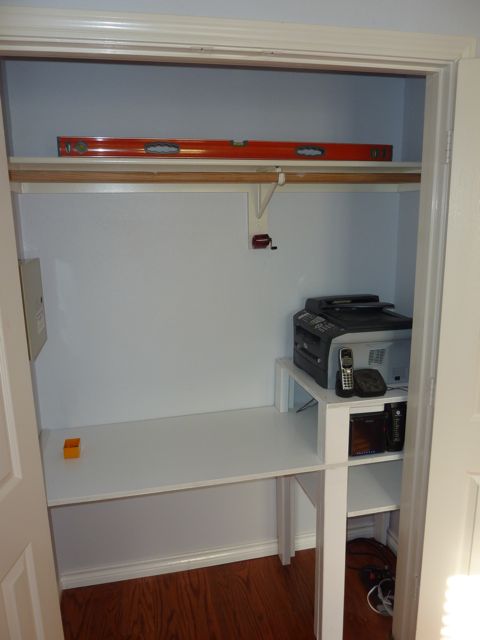
Installed
During the dry-fitting I discovered two problems and realized one problem during piece-construction:
I had measured the closet width “corner to corner” but the sheetrock bowed inwards in the middle. Taking -0.5” off the largest shelf-edge and I was back in business.
I neglected to take into consideration baseboard incursion. A bunch of weird free-hand cuts down on three of the legs and it fit.
I had orginally intended for each shelf to be 8” tall but I made a mistake on the bottom shelf, measuring 8” down and not adding in the 3/4” for plywood thickness.
Differences
Installation was pretty straightforward and the shelves as a whole feel nice and solid. I purchased some trim pieces for the front “desk” shelf and for the left-hand side to cover the cleat-screws. Those are yet-to-be installed, mostly waiting until I can prime / paint the trim. It’ll take 5 minutes to paint everything but 30 minutes to clean the brushes, etc. When I have the paint out I also need to paint over some of the exposed screw-holes on the shelf-top.
If you’d like to play with the SketchUp file, have at it. The best advice I have is to do the “three chairs” tutorial, use the tape-measure tool a lot, and paradoxically, sometimes it’s a lot easier to draw things out right the first time than it is to fix or modify an existing drawing.
In my quest to get the office put together (and get the printer, cable modem, wireless router and external hard drive out of the master bathroom), I’d like to put some extra shelves into the office closet.
After taking a bunch of physical measurements and some liberal use of the “tape measure” tool in sketchup, I came up with the above design. I’m indecisive on whether to consistently use cleats attached to the wall or stick with the uber-simple 3” post as drawn above.
Posts mean there is nothing permanently affixed to existing structure but you’d have to disassemble the shelves anyway to get it out of the closet (no other way to rotate the main shelf and legs to get it out of the doorway.
An undermounted cleat (like your regular closet shelf) on the non-printer side is an easy compromise and frees up a bit of usable space where the legs would have been. I still think I like the four posts under the printer but I might end up putting cleats on the post to support the main shelf and undershelf (the top shelf I imagine just screwing straight down into the top of each post).
If you have an opinion speak now or forever hold your peace.
Some people have been dogging the iPhone and Mobile Safari as “the new IE6”. The sentiment being that we’re going back to the “Best Viewed in XXX Browser” era. I am unabashedly in favor of this particular icing on the internet cake mostly because we are still living with IE6. :^)
What I mean to say is that having a locked down platform that is guaranteed to support all of HTML5’s new features means that web developers can innovate using the shiny new tools in the toolbox and hopefully those uses will make their way back into web development at large.
In addition, if you give an executive the choice between supporting IE6 and doing up a good iPhone / mobile implementation I think we’re at the tipping point where decision-makers are leaning away from IE6 and towards these newer technologies.
Like icing, however, too much of it can ruin a good cake. I don’t really want iPhone-only sites, but instead good small-screen experiences driving improvements which in turn drive faster and ~nicer~ desktop experiences.
My six month prediction sees an increase in “IE6 is officially not supported” messaging with IE6 phased out for the internet at large within a year or so (ie: one of the major JS frameworks drops IE6 support, makes it optional, or drops active testing against it).
A neat trick you can start playing with now is the following mojo to trigger different mobile Safari keyboards on web pages (nice!) which all devolve into <input type=”text”>:
Browser Support
What’s most interesting is that we’re starting to see some of these features
get implemented into browsers.
<input type=”number”> - iPhone keypad loads with numerics
<input type=”url”> - iPhone keypad loads with “.com” button
<input type=”email”> - iPhone keypad loads with “@” sign
Mobile Safari (on the iPhone) was quick out of the gate by adding support for
number, email and url. No validation is performed but special keyboards for
each input type are presented to aid in entering a value.
Most recently, Chrome 5 beta has support for the placeholder attribute.
And if you want to see state of the art on iPhone web experiences, check out the following:
NextStop.com - uses geolocation, local caching / storage, in-page ajax
m.expatliving.sg - uses page transitions, inline flick-scroll, and good URL-hiding
Joe Hewitt’s iUI - an older, general purpose library that managed to fool me into thining I had Belle & Sebastian on my iPhone when I accidentally left it up on the artist page.
Edit: *jQTouch - just ran into this one, looks like the jQuery toolkit for apps, lots of neat animations although in some ways it doesn’t feel as native
Experiment with non-mysql data stores (ie: HBase, Cassandra)
Ratings calculations over larger data sets (ie: Cascading / MapReduce / Hadoop)
The pricing for EC2 has always turned me off as it’s a tad high to just blow for no good reason. Looking at their recent rates, they have a new pricing option called “reserved” which reduces the daily price but for a higher upfront cost.
AWS EC2 - Small Instance:
~1.0ghz Xeon / Opteron
1.7gb RAM
160gb Disk
AWS EC2 - OnDemand Small Instance:
$0.085 / hr
= $2.04 / day
= $744.60 / year
AWS EC2 - Reserved Small Instance 1 year:
$0.03 / hr + $227.50
= $0.72 / day
= $262.80 / year
= $490.30 / year
AWS EC2 - Reserved Small Instance 3 years:
$0.03 / hr + $350.00
= $0.72 / day
= $262.80 / year
= ~$379.47 / year
With Dreamhost, I’m on the ~$190.80 every two years plan, paid up through 2011, which you can’t really beat with a stick. The only thing I’m currently using it for is a basic text-based blog and a few other PHP things but it is convenient and familiar for the basics. With that I’ve currently got ~500gb disk and ~11tb bandwidth, excess disk and bandwidth are not included in the above EC2 price comparisons.
So, currently Dreamhost is almost a rounding error compared to committing to Amazon and I’m not currently at the point where I have any traffic worth committing to the cost or overhead of working with EC2. The difficult part is that the development models vary significantly depending on whether I get to play with the cool toys and install my own packages on an EC2 instance or whether I’m stuck with what I can beat out of Dreamhost shared hosting.
I’d be all over an Amazon “90% idle” instance with ~1gb ram and 500mhz processor that was less expensive or didn’t have hard performance guarantees, but I’m guessing it’ll be a while before they go after that market.
If the airline charges $1 per ticket of course the plane will fill, but
the total revenue of $150 barely pays for an hour of a pilot’s salary. If
they charge $1000 a ticket then if they could fill the plane they’d make a
fortune, but only a small number of people are willing to fly at that price,
so again they can’t equal the fixed costs of flying a plane. But if the
airline can make those who are willing to pay it pay $1000, and others pay
$800, and others $500, maybe down to $100 or so, then the sum total over all
passengers is sufficient to pay for the fixed costs. In fact, some estimates
put the incremental cost of flying a single passenger as low as $30 (for the
meal and baggage and ticket handling), so that once the airline has committed
to flying the plane it is in their interest to sell a ticket for $30 rather
than let a seat go empty. But they must keep those who can pay more from
buying their ticket at low prices, a tough balancing act.
Youth is not a time of life it is a state of mind. It is not a matter of red cheeks, red lips and supple knees. It is a temper of the will; a quality of the imagination; a vigor of the emotions; it is a freshness of the deep springs of life.
Youth means a tempermental predominance of courage over timidity, of the appetite for adventure over a life of ease. This often exists in a man of fifty, more than in a boy of twenty. Nobody grows old by merely living a number of years; people grow old by deserting their ideals.
Years may wrinkle the skin, but to give up enthusiasm wrinkles the soul. Worry, doubt, self-distrust, fear and despair these are the long, long years that bow the head and turn the growing spirit back to dust.
Whether seventy or sixteen, there is in every beings heart a love of wonder; the sweet amazement at the stars and starlike things and thoughts; the undaunted challenge of events, the unfailing childlike appetite for what comes next, and the joy in the game of life.
You are as young as your faith, as old as your doubt; as young as your self-confidence, as old as your fear, as young as your hope, as old as your despair.
In the central place of your heart there is a wireless station. So long as it receives messages of beauty, hope, cheer, grandeur, courage, and power from the earth, from men and from the Infiniteso long are you young.
When the wires are all down and the central places of your heart are covered with the snows of pessimism and the ice of cynicism, then are you grown old, indeed!
My day-to-day job deals with video on the internet. Working with video has encouraged me to seek out and use a bunch of video-sharing sites to make sure our own site(s) are working, see how other people are doing the similar things, get ideas for features, feature parity and a whole host of other reasons.
I’ve currently got video up on video.yahoo.com, YouTube, and Facebook. Missing from this list are Vimeo / Break, Flickr (just uploaded some some short videos to collect a few more data points) and I’m sure a few others.
There are a lot of ways to slice and dice online video, notably absent from my list of sites is Hulu because I am not a big media company. Facebook (for example) doesn’t tend to attract professionally produced videos because it doesn’t have as much history as a site for public videos as much as it does for private videos. YouTube is clearly dominating the “wants everybody to see it” space as well as pirate copies of last night’s funny TV clips.
My general use of online video has been to post classical guitar video clips for my own motivation of learning and improving. That makes me an “inconsistent episodic publisher” … in between the person uploading video from last night’s party and Mr. Universal Studios ticking the “internet” checkbox on their distribution channel list.
In my opinion, the future of what we now call television is going to start from “inconsistent episodic publishers”. Look at StrongBad, “It’s Amazing”, ShitMyDadSays, Cheeseburger, FailBlog, etc. and that includes video. Anybody can be entertaining once or twice, but people who consistently entertain attract an audience, and an audience (can) attract money.
Bringing things back around to video on the internet- I as a publisher get the most out of sites that give me the most feedback from my audience. Take a look at this “Video Insights / Discovery” panel from YouTube:
Contrast this with the information that I got from video.yahoo.com:
…apart from the fact that I don’t have any ratings, there’s no histogram breakdown and the only other statistic that I get is “view count”. Thanks for nothing. The other video sites (including Facebook) aren’t much better, although I would have to think that Flickr’s Pro stats would start to give you some other breakdowns.
As a publisher, given the choice between “300 views” and “Your video just went viral on mobile phones in Canada”, I’m picking option “B” please, with an extra helping of ratings breakdowns and views over time.
This is predicated on having the basics working right (video transcodes, quickly, plays back, consistently, little to no downtime, etc), which is challenging in its own right. Since we’re past the point of “the basics have to work”, if you’re planning on doing stuff with video, make real sure you have a good statistics package on the backend or the ability to provide statistics back to publishers. The super-small-timers won’t care but the medium-to-large-timers will definitely appreciate it.
The wild-card in all this to me is Facebook / “Social Media”. If we cede the point that “YouTube has the data that publishers want”, we miss out on the fact that Facebook (or Twitter or Orkut / whatever) provides you with a built-in audience of people who likely want to watch your video.
What I see as the killer combo is posting YouTube videos to Facebook because you get all the distribution and social tools (sharing, fans, comments, etc) from Facebook, but the rich viewing statistics from YouTube.
The other video sites each might have some specialty aspect that they’re better at than others, but for episodic publishers nothing beats the audience stats that YouTube can provide.
For the individual / family video publisher, it seems that Facebook video is the way to go because you get the appropriate privacy controls and comments, and you generally aren’t concerned with demographics / statistics. You could get most of the way there by adding a checkbox after viewing saying: “Joe Smith watched this video [save]” … think of it like the “Like” button but basically providing a way for me as the poster to say: “@Joe Smith should watch this video” and keeping track of who has and hasn’t seen it yet.


